Sunday, March 31, 2024

Asus ROG Cetra True Wireless Speednova earbuds review - premium buds with some notable flaws

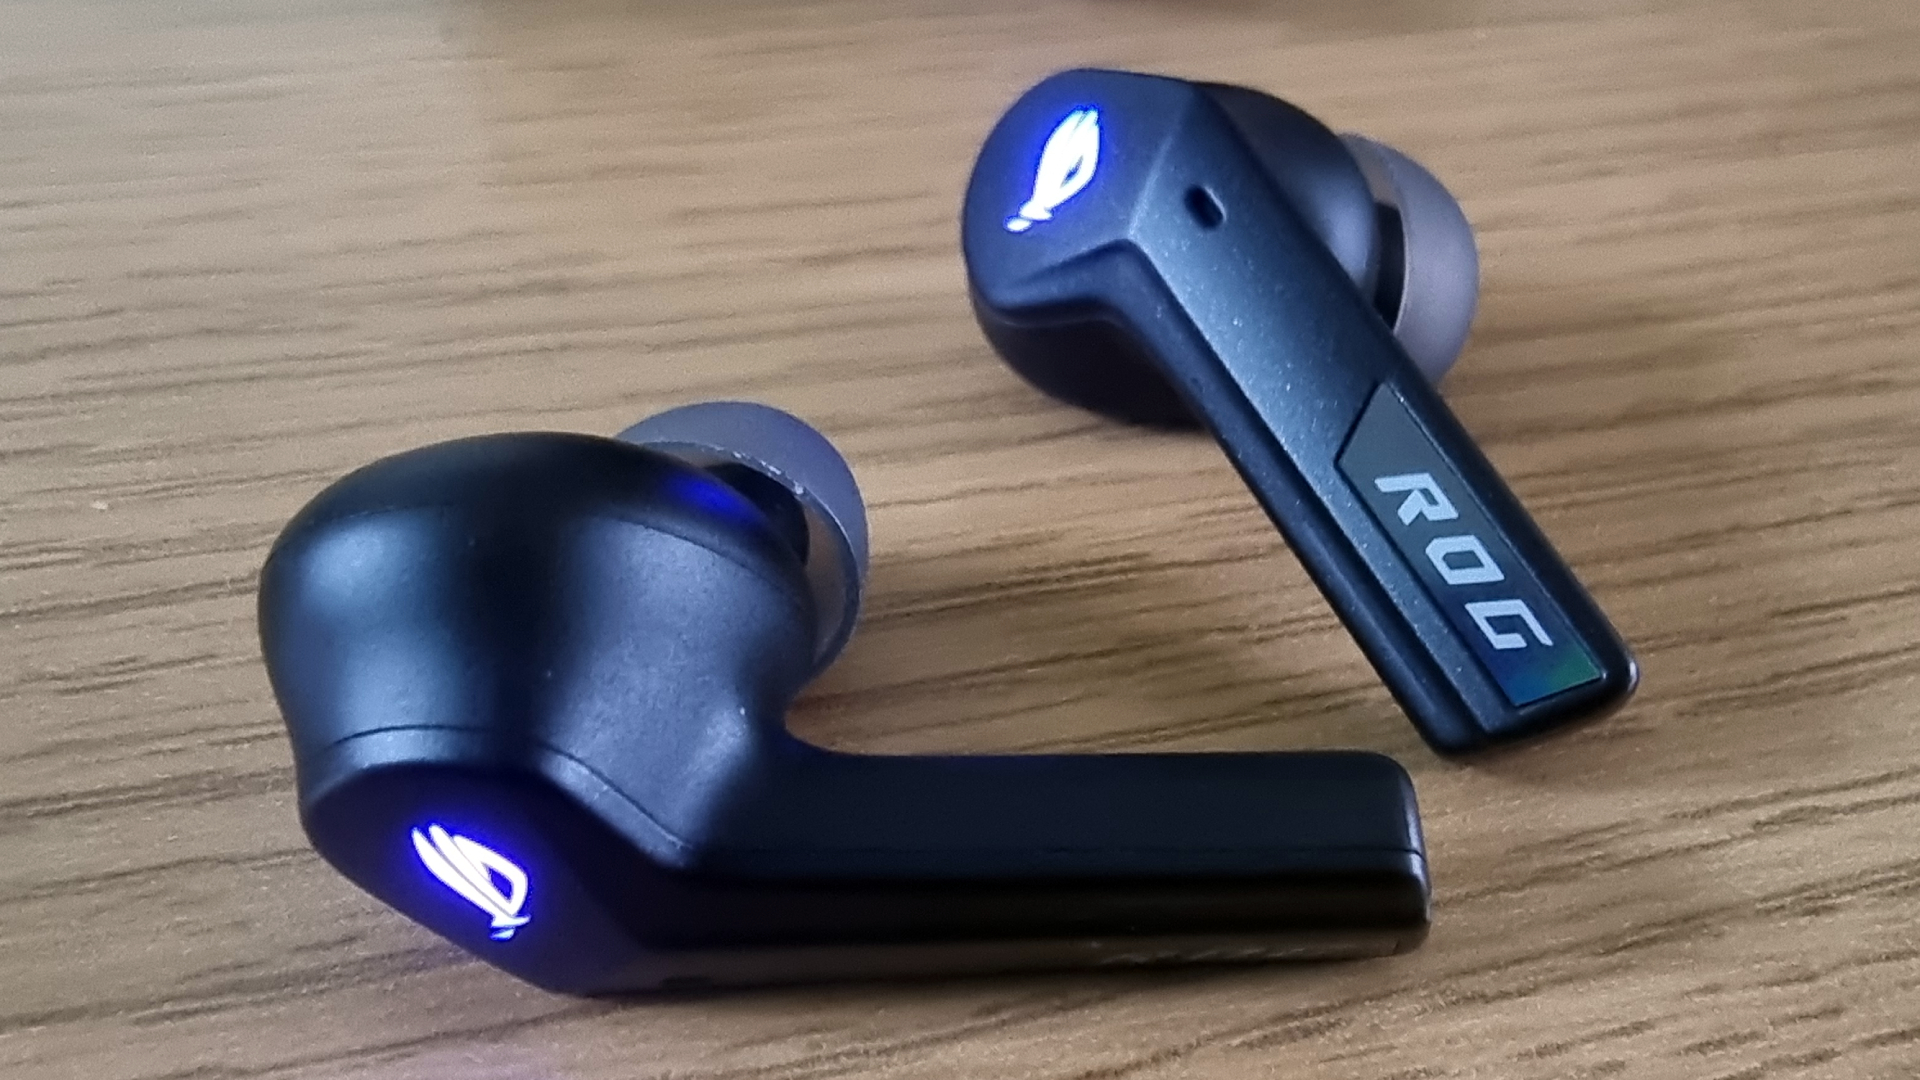
The Asus ROG Cetra True Wireless Speednova earbuds give a fantastic first impression. The eye-catching RGB-on-black aesthetic of both the earbuds and the charging case lend them a premium feel. That goes for overall audio quality, too, where there’s an impressive level of detail that you won’t often find even among the best gaming earbuds. As such, we can highly recommend them as a strong alternative to the likes of the Sony Inzone Buds or the Razer Hammerhead Hyperspeed.

That said, there are some missteps in terms of both design and performance. Despite coming with rubber tips of varying sizes, there’s a lack of comfort that makes the Speednova buds not best suited for longer sessions of play. They’re also not particularly great for multiplayer, with middling directional audio and some rather tinny voice quality. These could admittedly be dealbreakers when considering the earbuds cost $199.99 (and they’re yet to launch in territories beyond the US).

However, if you typically stick to single-player games or just want a rich music-listening experience, you’ll find that the Asus ROG Cetra True Wireless Speednova earbuds seriously excel in these areas.

Design and features

ASUS ROG Cetra

(Image credit: Future)

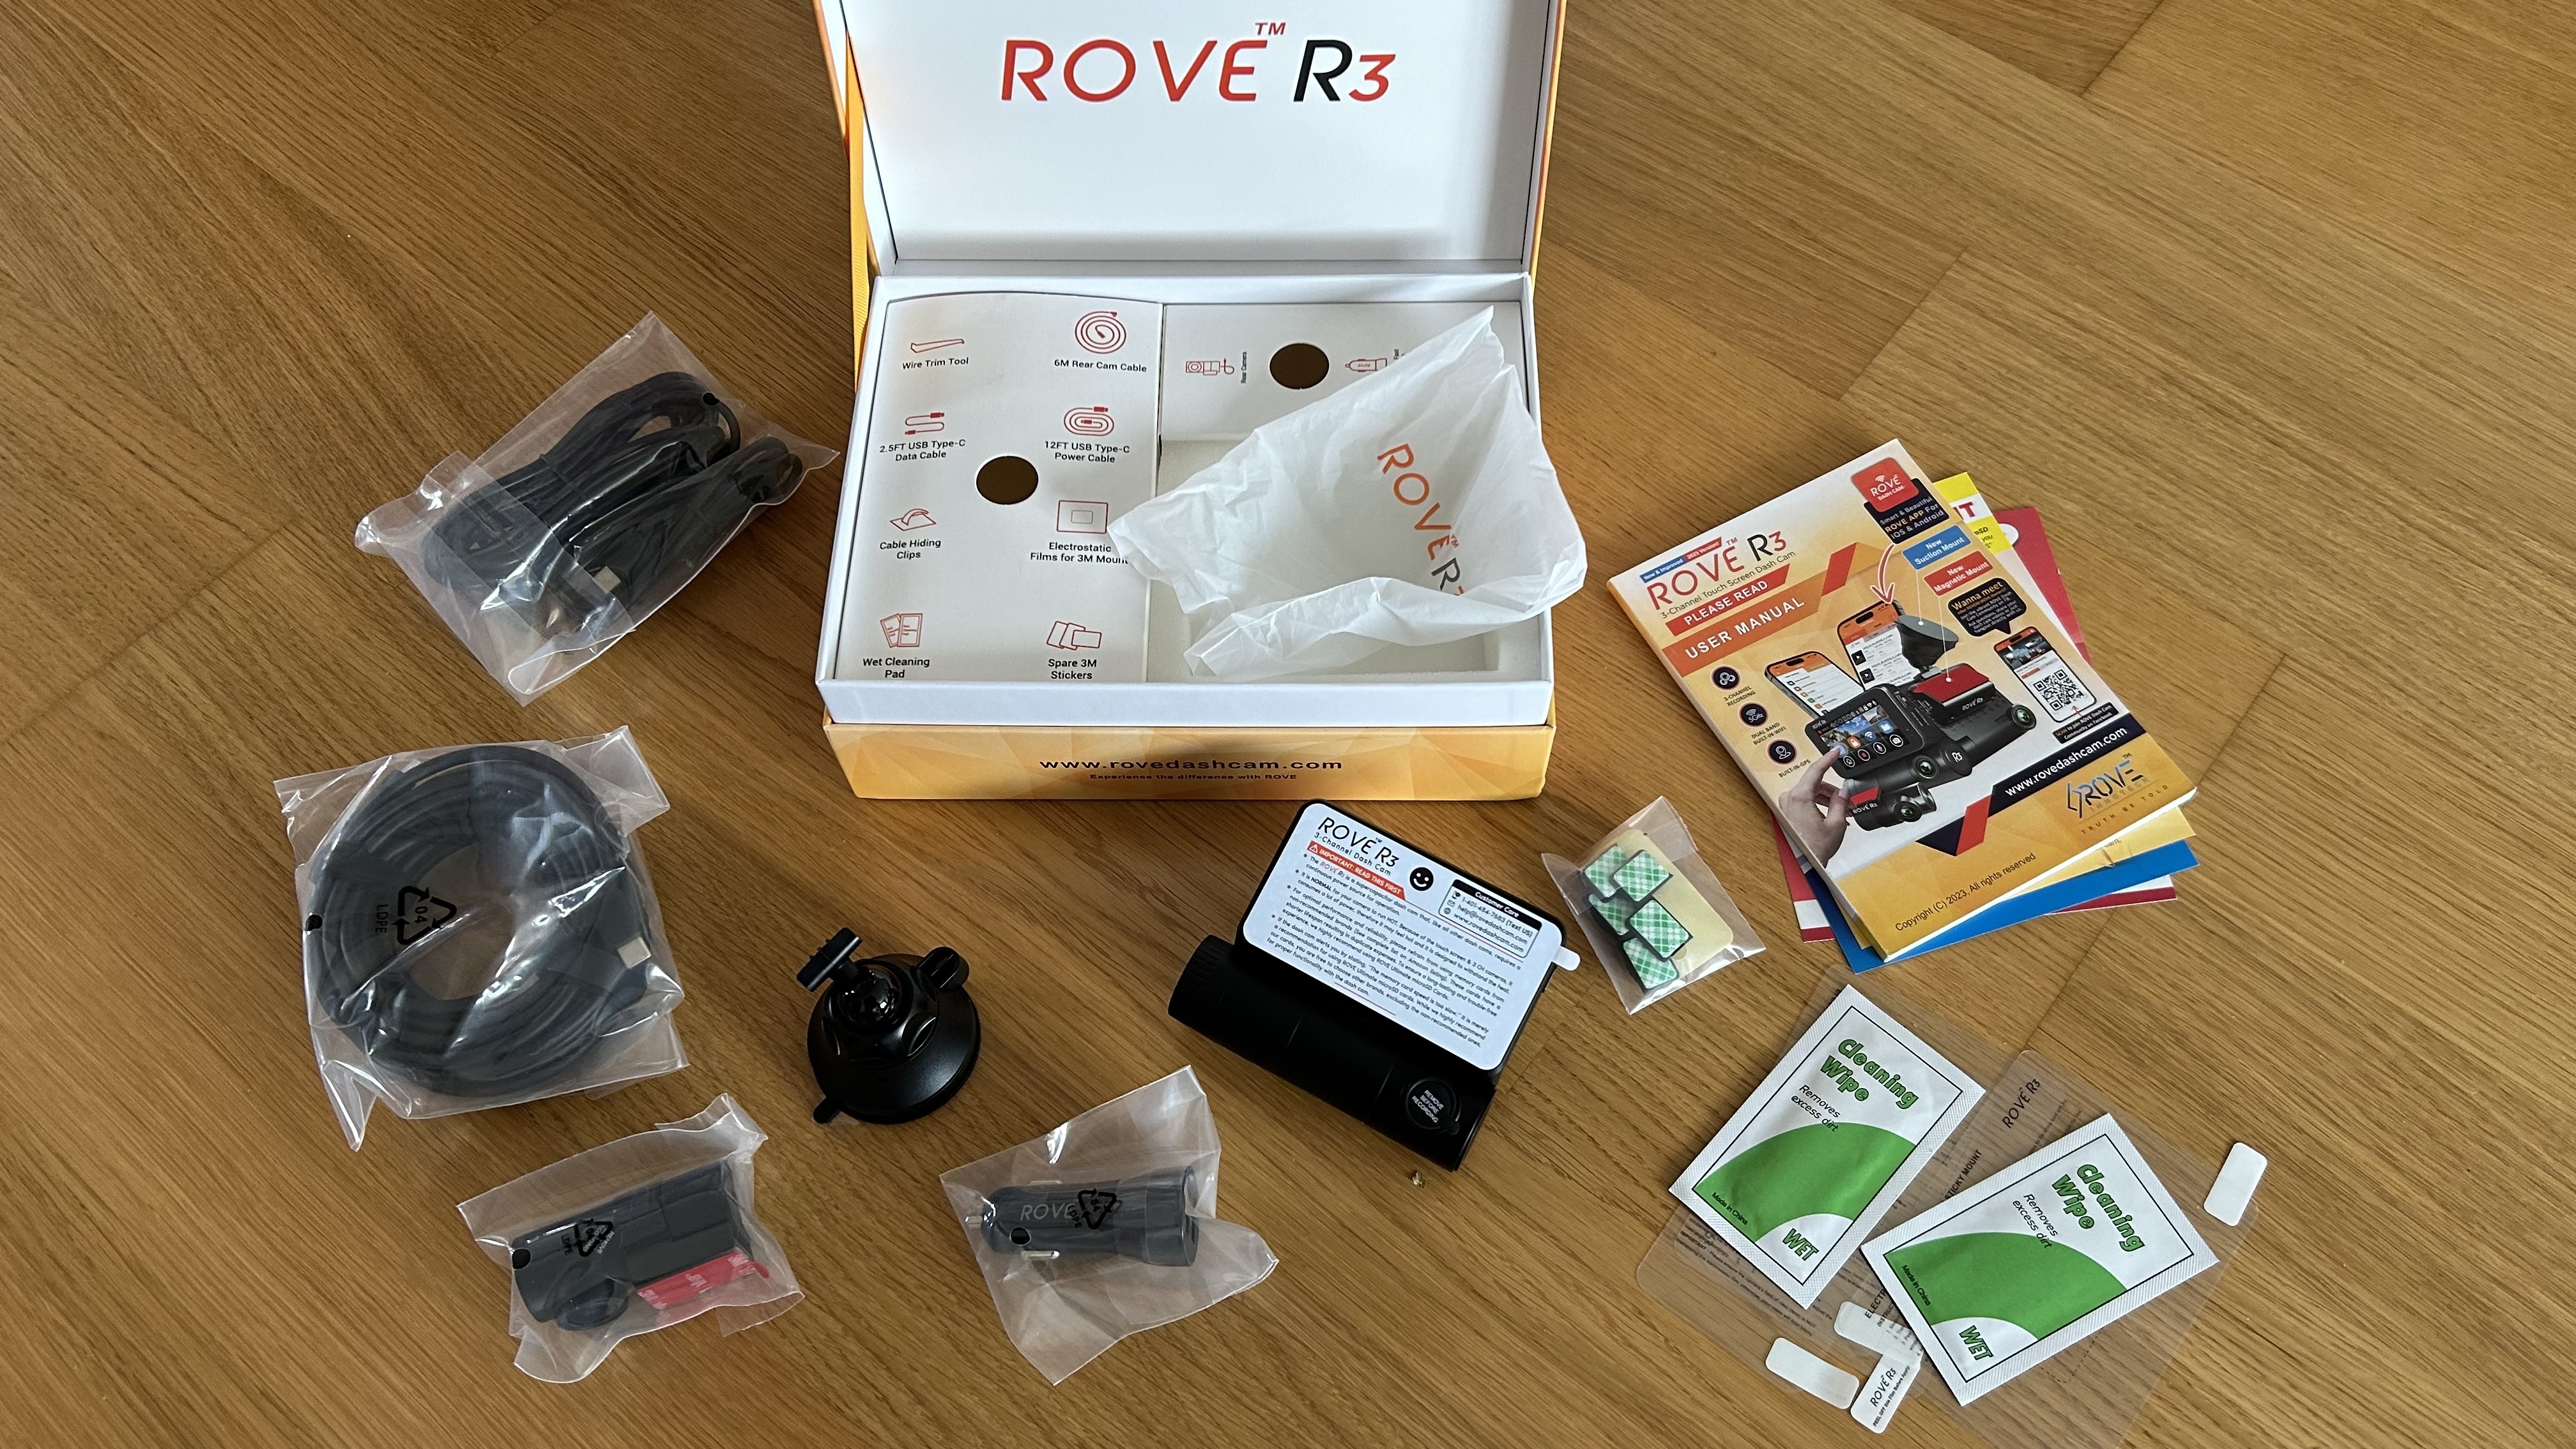
The Asus ROG Cetra True Wireless Speednova earbuds come packaged in a smart little box that offers all the essentials. You’ve of course got the earbuds housed in their charging case, alongside three different pairs of tips of varying sizes, a USB 2.4GHz dongle, and a USB-C cable for charging.

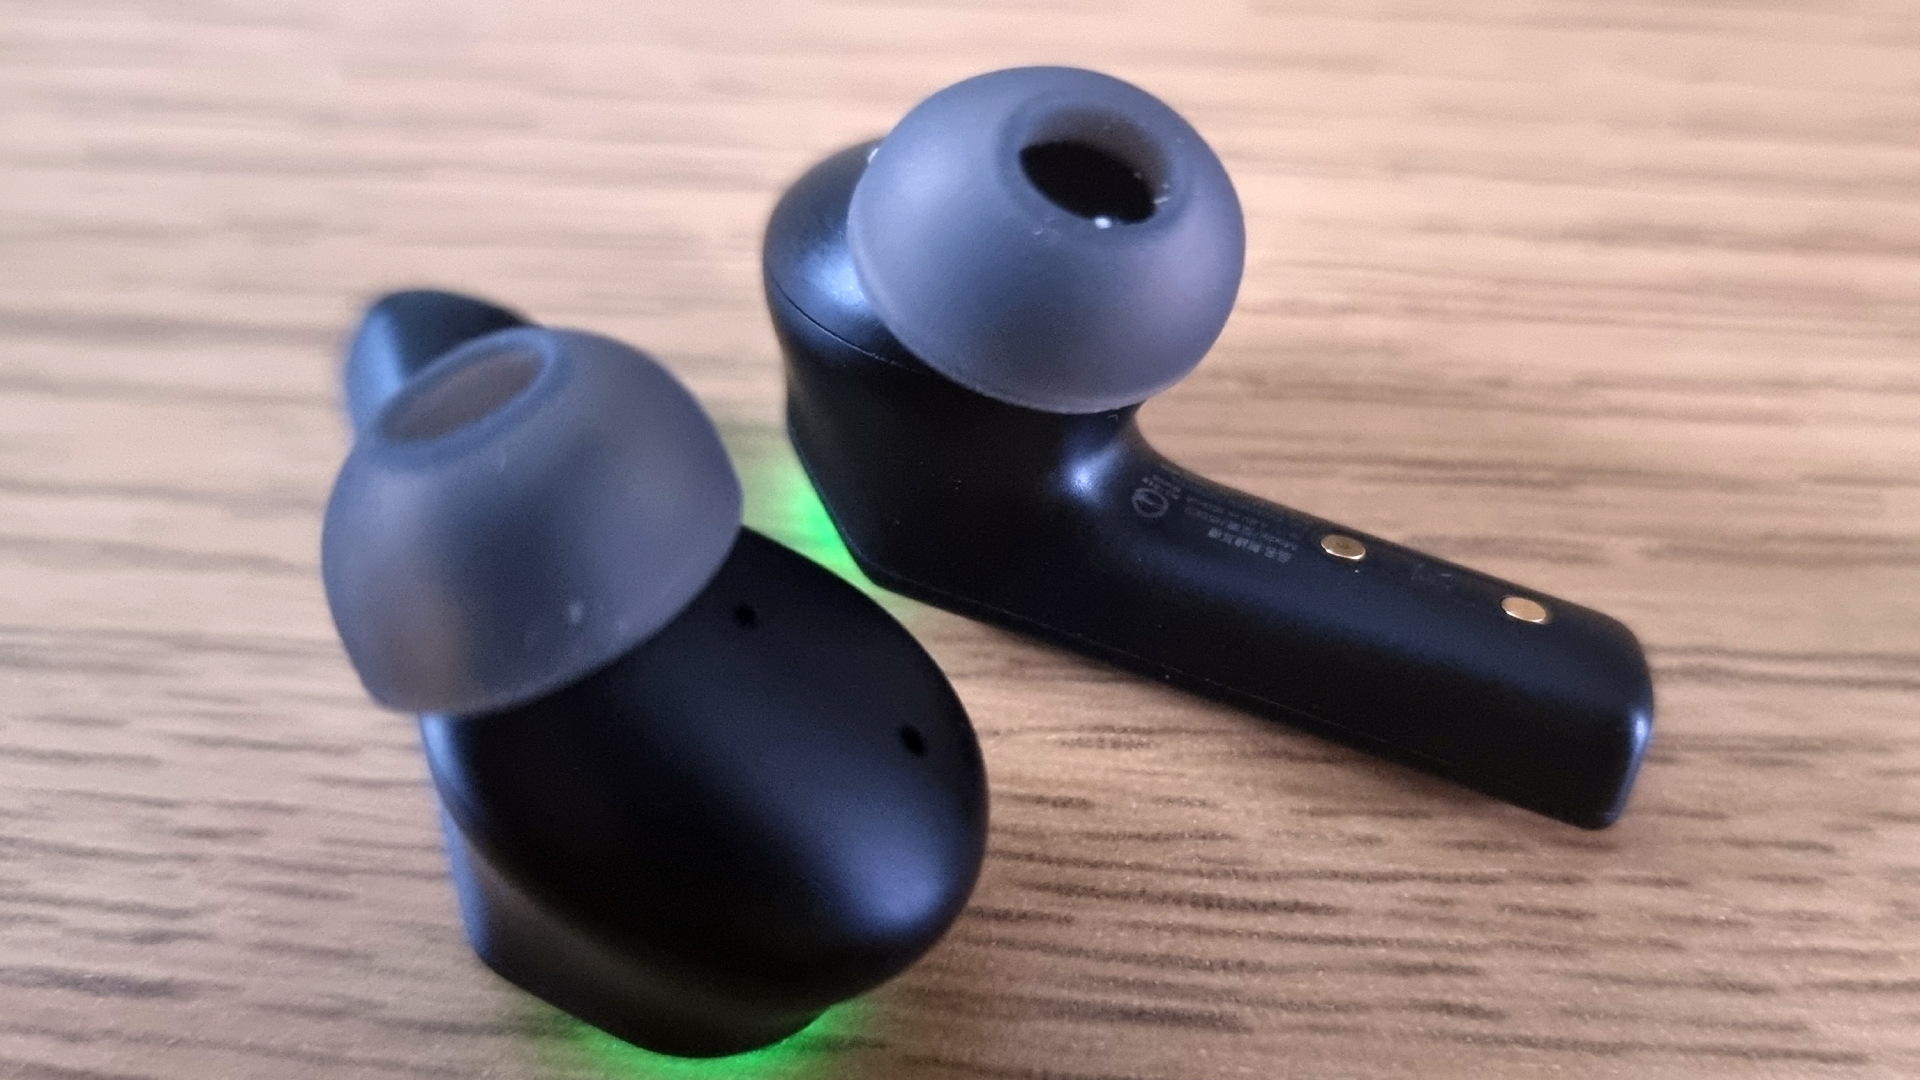
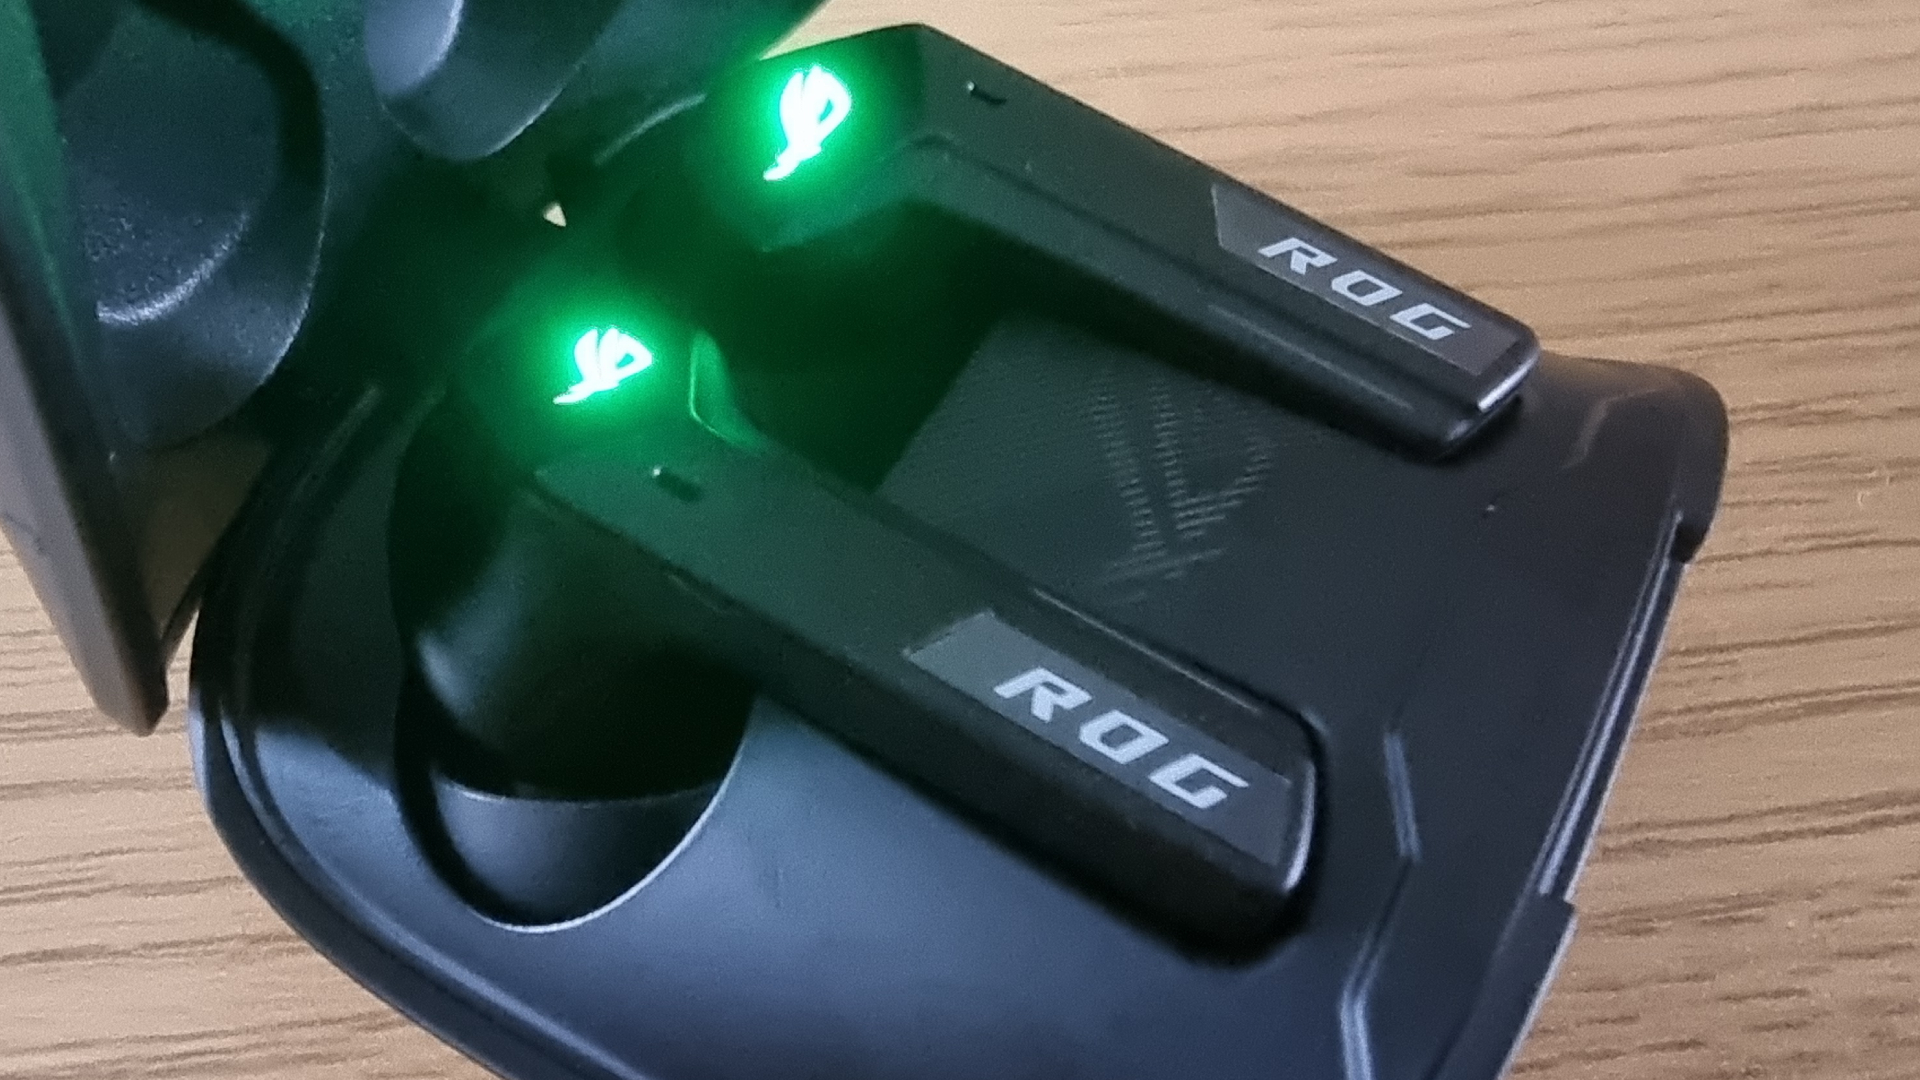
The charging case itself might just be my favorite among the more premium earbud offerings. The outer shell only bears the ROG logo and a light strip to indicate charging. Opening it up reveals another ROG logo, this time illuminated by some lovely RGB lighting. The buds themselves also share this RGB logo effect, and they, along with the case, are built from sturdy, high-quality plastic.

Unfortunately, the buds don’t feel particularly great in the ears after a long period of time. I tested each of the three tip sizes (small, medium, and large) over extended sessions and there wasn’t much of an improvement to overall comfort. Your mileage may vary here, of course, but I did have to take them out after one to two hours of use and swap back to my wireless gaming headset instead.

There’s quite a lot of touch-based functionality to the earbuds, too. A single tap of either bud will either play or pause audio - but doing this during a call will mute your microphone. Other functions include double-tapping to toggle active noise canceling (ANC) or a quadruple press to adjust volume. There’s a lot here, but it’s all thankfully very responsive.

Performance and battery life

ASUS ROG Cetra

(Image credit: Future)

Unfortunately, the buds’ level of comfort - or lack thereof - is a real shame, because the audio quality presented by the Asus ROG Cetra True Wireless Speednova earbuds is exceptional. The high-quality soundscape is bolstered by the use of Dirac Opteo technology which provides enhanced sound that’s able to really hone in on those finer details. This allows for overall much richer, detailed audio seldom heard in other gaming earbuds.

This was especially clear in busy single-player games like Rise of the Ronin. Here, the buds brought the bustling, winding streets of Yokohama and its various districts to life by enhancing background NPC chatter and ambient sounds, all without drowning out the wider soundscape. The in-depth sound of Tetris Effect: Connected was another highlight here, and I was super impressed with just how well the earbuds were able to catch even the subtlest details of the game’s remarkably layered soundtrack. In short, the Speednova earbuds allowed for an impressively immersive experience.

However, it is worth noting that the heightened audio quality provided by Dirac Opteo is only available via 2.4GHz connection. Over Bluetooth, while audio is still serviceable, noticeably flatter overall. The trade-off here, then, as you might expect, is that Bluetooth connectivity is much easier on the Speednova’s battery life. According to Asus, you’ll get up to 46 hours from the charging case via Bluetooth 5.3 here, and that’s with active noise canceling and RGB effects switched off. 

You can expect this number to be roughly halved with these effects enabled, as per the description on the Speednova’s product page. And in my experience, I found this to be largely true if a bit on the generous side. On average, the earbuds themselves carry anywhere between 6-12 hours of charge based on the combinations of features enabled. Though, mostly opting for a 2.4GHz connection, I found a single charge to carry around 4-5 hours with RGB disabled and ANC switched on.

Unfortunately, the buds fall short of being absolutely perfect due to lackluster multiplayer performance. Directional audio isn’t the best here, and certainly not up to the level of some of the best PS5 headsets which are better able to hone in more accurately on footsteps and distant vehicles, for example. The built-in microphone is also lacking, rendering my voice with a pretty tinny register with an overall lower quality than some much cheaper buds on the market like the SteelSeries Tusq.

Should I buy the Asus ROG Cetra True Wireless Speednova earbuds?

asus rog cetra

(Image credit: Future)

Despite some issues with comfort and call quality, the Asus ROG Cetra True Wireless Speednova earbuds are among the most impressive when it comes to sheer audio quality, largely helped by the fantastic Dirac Opteo technology. If you’re after something for immersive single-player experiences or are something of an audiophile, these buds come highly recommended. 

Buy them if...

Don't buy them if...

How we tested the Asus ROG Cetra True Wireless Speednova earbuds

I tested these earbuds for nearly two weeks across many of the best PS5 games, as well as titles on PC and Nintendo Switch. To put the earbuds through their paces, I largely elected to test them with all features enabled, including Dirac Opteo audio via 2.4GHz connection and active noise canceling.

The buds shone in single-player titles, and I found it very hard to pull myself away from titles like Rise of the Ronin, Dragon’s Dogma 2, and The Legend of Zelda: Tears of the Kingdom as a result. While I did find the battery life to be rather inconsistent based on the number of features enabled, I eventually chose to disable the RGB effect to squeeze a couple more hours of use out of them before needing to charge them up again. 

Rove R3 Dash Cam review: ticks all the boxes

Two-minute review

If you’re looking for a dash cam that can do a little bit of everything, the Rove R3 Dash Cam is well worth investigating. Even some of the best dash cams on the market don’t always come with all the features and functionality needed for comprehensive protection. The  Rove R3 Dash Cam carries an impressive specification, with a 3-channel touchscreen dash cam being the core component.

However, armed with cabin and rear cameras too, it delivers a comprehensive range of video coverage, including 1440p video capture out the front, 1080p footage in the cabin, and 1080p out the back. There’s voice guidance, built-in GPS and 5GHz Wi-Fi, plus a very practical parking mode feature for keeping tabs on things when you’re not in your vehicle.

Image 1 of 10

Rove R3 dash cam

(Image credit: Future)
Image 2 of 10

Rove R3 dash cam

(Image credit: Future)
Image 3 of 10

Rove R3 dash cam

(Image credit: Future)
Image 4 of 10

Rove R3 dash cam

(Image credit: Future)
Image 5 of 10

Rove R3 dash cam

(Image credit: Future)
Image 6 of 10

Rove R3 dash cam

(Image credit: Future)
Image 7 of 10

Rove R3 Dash Cam

(Image credit: Future)
Image 8 of 10

Rove R3 dash cam

(Image credit: Future)
Image 9 of 10

Rove R3 dash cam

(Image credit: Future)
Image 10 of 10

Rove R3 dash cam

(Image credit: Future)
Rove R3 Dash Cam Price and Availability

If you can put up with all the pop-ups on the official site, the Rove R3 Dash Cam is available direct. Your best bet is to head to Amazon, where the RRP of $399.99 is currently discounted to $199.99 – though this could obviously change at any time. The package comes with everything you need, including front and rear cameras and all the accessories for fitment and use. However, a hardwire kit and microSD cards are available as extras.

Rove makes a big deal about this model being powered by a Super Capacitor, which is mentioned quite a lot in the promotional blurb. In other words, the dash cam opts to use one of these over a lithium-ion battery. 

It makes no difference in the grand scheme of things if you’ve got the camera connected by default anyway. Having said that, Rove reckons this makes it more useful to folks who might encounter extreme temperatures ranging from -4°F (-20°C) to +158°F (+70°C). Extreme adventurers take note.

Rove R3 Dash Cam

(Image credit: Future)

Rove R3 Dash Cam: design

The Rove R3 Dash Cam arrives in a box that flips up to reveal just about everything you need from a complete solution dash cam package. The artwork looks like it was designed using a home desktop publishing package and is quite chaotic in places, but, looking past that, the initial impressions made me keen to get the Rove R3 Dash Cam set up.

Full marks should go to Rove for providing a comprehensive, full-color manual that outlines all the steps for getting set up and how to use video once it's been recorded. There’s a supplementary app for both iOS and Android too. it's possible to use everything without calling on it if you’re not fussed, but it does enhance the overall user experience if you do.

Also inside the box are the main camera, a smaller rear camera, a 4.8 AMP dual charger plug, a suction mount, a wire trim tool, a 2.5ft USB Type-C data cable, a lengthy rear camera cable, a 12ft USB Type-C power cable, cable hiding clips, electrostatic films, a wet cleaning pad, and spare 3M adhesive stickers.

Image 1 of 8

Rove R3 Dash Cam

(Image credit: Future)
Image 2 of 8

Rove R3 Dash Cam

(Image credit: Future)
Image 3 of 8

Rove R3 Dash Cam

(Image credit: Future)
Image 4 of 8

Rove R3 Dash Cam

(Image credit: Future)
Image 5 of 8

Rove R3 Dash Cam

(Image credit: Future)
Image 6 of 8

Rove R3 Dash Cam

(Image credit: Future)
Image 7 of 8

Rove R3 Dash Cam

(Image credit: Future)
Image 8 of 8

Rove R3 Dash Cam

(Image credit: Future)

The build quality of all the components feels as good as that found on any of the other best dash cams. I like the robust feel of the main camera and the 3-inch screen is big enough to touch even if you’ve got chunky fingers. The design is also nicely laid out: I quickly knew where all the cables needed to go as they’re marked up logically. All I needed to do was pop in a microSD card and start plumbing it all in.

Considering the Rove R3 Dash Cam is a complete solution package, there’s inevitably time to be spent sticking the cameras on the front and rear screens. I made use of the electrostatic sheets, which saves getting your screen covered in gum from the adhesive if I have to take it off again. The wiring, especially for the rear, takes further time to push in around the headliner, but I found the included tool made fairly light work of that. It all plugs in easily enough, though.

I especially like the way you can mount the main camera as it is, straight to your screen. Alternatively, there's the option to use the mount, which means it can be more easily positioned if any adjustment is needed. I got lucky the first time with my screen-mounted route, but either option works well depending on your requirements. Usefully, the lens in the main camera can also be twisted in a circular motion, so the view of the road can be adjusted easily.

Rove R3 Dash Cam

(Image credit: Future)

Rove R3 Dash Cam: Performance

Setup took me about 30 minutes all told, which is reasonable. I then powered up, which happens automatically if you’re plugged in, and had to pick through a few options to configure the camera.

It involves common tasks, such as formatting the memory card (which was included in my test example but isn't normally), setting the date and time, choosing a time zone and carrying out any customization options. I plugged the dash cam into my 12V electrical socket, though you can buy a hardwire kit if you’re looking for a permanent installation. 

There’s a small button on the side of the camera to manually power up, but, once installation is complete and it has power, the Rove R3 Dash Cam engages its video recording mode automatically.

Conversely, the Rove R3 Dash Cam will stop recording if you power down your ignition (or unplug it) within 1 to 2 seconds. It will save the last video being recorded, so there’s no fear of losing any footage. I felt happy to use the camera in its default setup and settings arrangement, but dipping into the menus lets you easily tweak most aspects of the functionality.

Perhaps my favorite aspect of the Rove R3 Dash Cam is the three-channel coverage thanks to having a front camera, a rear-facing one, and the lens built into the main unit that covers the cabin area. Adding to the appeal is the built-in GPS Geotagging (incorporated into the mounting point of the main camera), which means the footage always has live speed and location data as part of the capture process. Getting footage off the cameras was easy too, with dual-band Wi-Fi (5GHz and 2.4HGz) straight to the app proving handy.

I removed the card and reviewed the footage on the larger screen of my laptop, with crisp and clear results returned by all three cameras. The 150-degree view provided by the f1.4 front lens, which uses a 5-megapixel OmniVision OSO5A10 CMOS sensor is solid and more than usable for picking out the definition on number plates and the like. The cabin and rear cameras feature f1.8 a 140-degree field of view with 2-megapixel Sony Starvis IMX307 sensors on board.

Rove R3 Dash Cam

(Image credit: Future)

Overall, after-dark footage was impressive, with, again, plenty of definition coming from all three cameras. The Rove R3 Dash Cam seems to react well to changes in light too, even inside the cabin as I moved past street lights, which can frequently make footage look less than brilliant. The G-Sensor tech, which works for the parking monitor, only engages if it’s hardwired, so I didn’t get the chance to try this. Aside from checking the sensitivity though, I see no reason to doubt the quality of the footage it captures.

The screen on the back of the camera is a little busy, with a host of function icons along the top and the different camera views under that, but, as with most dash cams, I find everything works best if I keep tabs on footage via the app or on my laptop. The screen is perfectly serviceable for carrying out tweaks to any of the settings, though.

Should you buy the Rove R3 Dash Cam?

Rove R3 Dash Cam

(Image credit: Future)

Buy it if...

Don't buy it if...

How I tested the Rove R3 Dash Cam

  • I used it every day over several weeks
  • I used it on a wide range of journeys
  • I recorded video for extended periods

After installing it in my car, I put the Rove R3 Dash Cam through its paces over the span of two weeks, leaving it in situ for the whole test period. During that time, I used my car for a variety of journeys, from shorter commutes to longer runs. As well as using all the features and functions found within the camera, I also experimented with the app and downloaded footage to my laptop for closer inspection. The only feature I didn’t experience was the motion-sensing option, which only works if the Rove R3 Dash Cam is hardwired into a vehicle.

  • First reviewed March 2024

Samsung QN90D 4K TV review – mini-LED magic for movies and sports

The Samsung QN90D series is among the company’s top 4K mini-LED TVs for 2024. It replaces the Samsung QN90C series, which ranked on our list of best TVs in 2023 as the best model for sports owing to its exceptional brightness, anti-glare screen coating and wide viewing angle. The QN90C series launched in screen sizes ranging from 43- to 85-inches. For 2024, Samsung will expand the lineup with a 98-inch model, one benefiting from the company’s new Supersize Picture Enhancer for ultra-large TVs.

Samsung recently invited me to its New Jersey facility to do a hands-on test of the 65-inch QN90D model. Having reviewed last year’s QN90C, I was eager to see what, if any, improvements had been made to the new series. I had sufficient time during my visit to do a full set of measurements, and also had substantial time for subjective tests. Read on for my thoughts on the QN90D, which improves on last year’s model, and is in many ways a worthy, and much lower-cost, competitor to the new Samsung QN900D 8K mini-LED TV and Samsung S95D OLED TV, both of which were also tested during my visit.

Samsung QN90D closeup of pedestal stand

The Samsung QN90D's pedestal stand (Image credit: Future)

The QN90D series is available in 43-inch to 98-inch screen sizes. Pricing for the lineup is notably higher than for last year’s QN90C series, particularly for the larger 75- and 85-inch screen sizes.

  • 43-inch: $1,499 (around £1,190 / AU$2,300)
  • 50-inch: $1,599 (around £1,270 / AU$2,450)
  • 55-inch: $1,999 (around £1,580 / AU$3,060)
  • 65-inch: $2,699 (around £2,140 / AU$4,130)
  • 75-inch: $3,299 (around £2,610 / AU$5,050)
  • 85-inch: $4,799 (around £3,800 / AU$7,350)
  • 98-inch: $14,999 (around £3,640 / AU$22,980)

Samsung QN90D shown in profile in room with gray walls

The Samsung QN90D has a very thin profile for a TV with a built-in backlight and input connections (Image credit: Future)

An updated NQ4 AI Gen2 processor with 20 AI neural networks powers audio and video on the QN90D series. Picture enhancements include Neo Quantum HDR+ and HDR Brightness Enhancer to improve the look of 4K images with HDR, and there’s also an Auto HDR Remastering feature to give a dynamics boost to regular HD sources. Quantum Matrix Technology helps with backlight control for local dimming, and same as with the QN90C there’s an anti-glare screen coating and Ultra Viewing Angle to improve picture uniformity when viewing from off-center seats.

The QN90D has a 4.2.2-channel built-in speaker system powered by 60 watts and provides many of the same audio processing features found on the company’s other premium TVs. These include Object Tracking Sound+, which expands the sound field to heighten the impact of Dolby Atmos effects and Active Voice Amplifier Pro, which boosts both dialogue and sound effects to heighten their clarity in the mix. The QN90C also supports Q Symphony for combining the TV’s speakers with supported Samsung soundbars for even greater audio immersion.

Gaming features on the QN90D series include four HDMI 2.1 inputs with 4K 120Hz support (and up to 144Hz for PC gaming) and FreeSync Premium Pro. There’s also Samsung’s Gaming Hub, which serves as portal for accessing more than 3,000 titles from cloud-based apps such as Xbox, Nvidia GeForce Now, Utomik and more. Samsung’s Game Bar menu now also features an AI Auto Mode option that can recognize game genres and adjust picture and sound settings to suit. During my test, I measured input lag in Game mode at 9.7ms – an excellent result that about matches last year’s QN90C.

Samsung QN90D Cloud gaming portal screen

The cloud gaming section of the Samsung QN90D's Gaming Hub (Image credit: Future)

Brighter and better-looking 

With the QN90D set to its Movie picture mode, pictures were seriously bright and had excellent contrast even when viewing with overhead room lights turned on. Peak brightness measured on a white 10% window pattern was around 2,000 nits, and brightness with a full-screen white pattern was just short of 600 nits. Those numbers indicate a modest boost over last year’s QN90C, a TV that in my estimation already had brightness to spare.

The QN90D’s color gamut coverage was about the same as what I measured on the QN90C at 94% for UHDA-P3 and 71% for BT.2020.

I normally wouldn’t expect a small brightness boost to have an impact on a TV’s performance, but I was fully captivated by the QN90D. Watching the demonstration footage section on the Spears & Munsil HDR Benchmark 4K Blu-ray disc with the 2,000 nits version selected, images of snow-capped mountains at sunset showed powerful and detailed highlights, while darker scenes revealed a marked improvement in local dimming over last year’s QN90C, with only the slightest degree of backlight blooming visible on high-contrast shots.

The QN90D’s picture maintained excellent uniformity when viewed from off-center seats (see pic below). There was some judder and motion blur visible when I watched a reference scene from the James Bond movie No Time to Die with the TV at its default Movie Mode settings, but a quick visit to the motion settings in the picture setup menu fixed that issue. 

Samsung QN90D shown at angle on table

The Samsung QN90D has excellent off-axis picture uniformity for an LCD-based TV (Image credit: Future)

A relative bargain 

At $2,699 (around £2,140 / AU$4,130) for the 65-inch model Samsung made available for my hands-on test, the QN90D isn’t exactly cheap. But having tested it during the same session where I did hands-on reviews of the much more expensive QN900D 8K mini-LED and S95D OLED models, it comes across as a bargain in the Samsung TV universe. It will take a full review to determine just how good the QN90D ultimately is, but given my relatively brief time with it, I found it to be the TV that left the strongest impression.

You might also like

Friday, March 29, 2024

T3 Afar review: light, breezy and easy to travel with

One minute review

T3 sells a range of standard and compact-size hair dryers, with the T3 Afar design marketed as the brand’s travel hair dryer. Having reviewed both the T3 Fit and T3 AireLuxe models, I was interested to see how different an experience the T3 Afar would deliver. 

While the Afar model is very different from the T3 AireLuxe in terms of settings and shape, it does share some similarities to the equally compact T3 Fit. However, the T3 Afar’s foldable handle makes it far more suitable for traveling, and it's easily one of the best hair dryers for that reason. 

Overall, the T3 Afar feels sturdy, which isn’t true of many travel hairdryers. The handle, too, shows no signs of flimsiness, instead feeling smooth, solid and comfortable in the hand. 

Inside the box, you get one concentrator nozzle that clicks onto the body of the T3 Afar and can be adjusted to direct the airflow as you wish. Like both the AireLuxe and Fit models, the Afar has an ion generator that saturates the airflow with negative ions to create a smooth and silky finish when drying hair. I found that while the T3 Afar doesn’t dry hair as quickly as a standard hair dryer, it does produce satisfying results, limiting flyaway hair in the process. 

A travel pouch is also included in the box; it’s made from vegan leather and feels well-crafted and is easy to wipe clean, and sufficiently roomy for storing the folded hair dryer and the styling nozzle. In fact, it even has space for the hairbrush or diffuser attachment, which are sold separately. 

T3 AFAR hairdryer with luxury travel pouch and nozzle

(Image credit: Future)

T3 AFAR: PRICE AND AVAILABILITY

  •  Free 30-day returns 
  •  Luxury travel pouch included 
  •  2-year warranty 

The T3 Afar is significantly pricier than the average travel hair dryer you can buy from Amazon, but its ergonomically designed features place it a step above and make it easy to achieve great results. 

At the time of writing, you can buy the T3 Afar for $179.99 | £150, which includes a luxury travel pouch and one concentrator nozzle. If you have wavy, curly or coily hair, you may want to add the T3 Afar diffuser attachment, but this is sold separately and costs an extra $25 | £20.     

Rating: 4/5

T3 AFAR hairdryer in the box

(Image credit: Future)

T3 AFAR: SPECS

T3 AFAR hairdryer on the side

(Image credit: Future)

T3 AFAR: DESIGN

  •  Stylish satin blush finish 
  •  Foldable handle makes it easy for transporting  
  •  Controls are easy to use  

A soft pink, satin blush finish and lightweight design make the T3 Afar both easy to hold and easy on the eye. At 381g, it’s much lighter than your standard hair dryer; however, this not only limits arm ache over prolonged use, but also makes it a great option to pop in your hand luggage when travelling.

In fact, the T3 Afar’s USP is that it’s 25% lighter and 30% smaller than a full-size T3 hair dryer such as the T3 AireLuxe. Size-wise, it’s similar to the T3 Fit, which weighs in at 400g. It’s as compact as the Dyson Supersonic, which is considerably heavier at 659g. As a regular user of the Dyson Supersonic, I found the T3 Afar did feel far lighter in hand and offered a very different drying experience, which took me a few attempts to become used to. However, the results were just as satisfying.

T3 AFAR hairdryer facing forwards

(Image credit: Future)

In particular, I welcome how cleanly the T3 Afar’s handle folds in and out, clicking into place each time. The heat and speed settings are well positioned, again clicking into position so there’s no risk of accidentally adjusting the settings while in use. 

The T3 Afar’s cord length is ample at 6ft 2, which delivered more than enough flexibility to move around freely when drying my hair at the dressing table. For context, with a cord length of around 8.4ft, the Dyson Supersonic is rather more generous.  

The T3 Afar is missing a hanging hook with which to store the hair dryer upside down, but since it’s been designed for travel, it may have been deemed unnecessary. However, in the box you do get a vegan leather travel pouch for storage purposes. And since the hair dryer has auto dual voltage, you only need to add a plug adapter when travelling abroad.  

Design: 4/5

T3 AFAR: PERFORMANCE

  •  Ion-infused airstream for fast and gentle drying  
  •  Reduces frizz and smooths hair  
  •  Flexible heat and speed settings  

As someone who has wavy hair that’s prone to frizz, having a hair dryer that can smooth my hair quickly and easily is a priority. In general, travel hair dryers have a reputation for being flimsy in design and underpowered; but I found the T3 Afar surprisingly powerful, and sturdy and comfortable to use. At 1,500 watts, this may not provide as powerful an airflow as a standard hair dryer such as the 1,875-watt T3 AireLuxe, but it can still pack a punch to deliver stylish results. However, like the AireLuxe, the T3 Afar comes with “IonAir” technology. This creates a wide, ion-infused airstream that gently dries hair, while smoothing the hair cuticle to minimize frizz and enhance shine. 

Three heat and two speed settings provide plenty of flexibility to style with confidence. I found that switching between the two speed and three heat settings was easy, and while I preferred to ramp up to the highest speed and heat setting to get faster drying results, I can appreciate that the lower settings are beneficial for those drying shorter hair or even children’s hair.

It took me a while to figure out how to use the cool shot – it needs to be clicked into place rather than simply held down – but once familiar, I found that this actually made the whole process of setting a style easier.

Both the concentrator nozzle and diffuser fit cleanly into position on the head of the hair dryer. I welcome the fact that I could click and turn the concentrator nozzle, meaning I could easily adjust the airflow to suit my styling needs. Being able to channel the airflow more definitively helped me to achieve smoother results when blow-drying and styling more difficult to reach locks at the back of my head. I watched the T3 video on how to create a bouncy blow out and was pleased with the results. The trick is to use a 2-inch round brush and direct the airflow downwards. 

Overall, those used to using a standard hair dryer such as the GHD Helios are likely to find that the T3 Afar will take some getting used to since it doesn’t feel as  satisfying for power. However, as a travel hair dryer capable of producing smooth and stylish results, I found the T3 Afar impressive.

Performance: 4.4/5

T3 AFAR and GHD Helios comparison

(Image credit: Future)

Should I buy the T3 Afar?

Buy it if...

Don't buy it if...

Also consider...

How I tested the T3 Afar

  • Used the included attachment
  • Tested on long, wavy, frizz-prone hair
  • Testing was done during winter months in the United Kingdom

To test the T3 Afar, I used it for several weeks to dry my hair from wet. I tried both the included concentrator nozzle as well as the additional diffuser, trying different styles and techniques as well as measuring the sound output.

As it's a travel hairdryer, I also put the design through its paces in order to see how durable it is as well as how easy it would be to travel with. 

I've been testing lifestyle devices for years, and have been drying my hair for even longer, so I make sure to prioritise the right things when it comes to reviewing hair dryers; performance, value and design. 

Read more about how we test

[First reviewed March 2024]

Wednesday, March 27, 2024

Brother MFC-L3750/MFC-L3760CDW review

Specs

Type: color A4 laser multifunction printer

Functions: Print, scan, copy, fax 

Connectivity: USB, Wi-Fi, Ethernet 

Data storage slots: USB Host    

Print speed: 26ppm (mono) 

Paper capacity: 250 sheets 

Print quality: 600 x 1,200 dpi

Scan quality: 1,200 x 1,200 dpi

Apple AirPrint: yes 

Consumables included: 4x toner cartridges (1,000 mono pages, 1,000 color)

Dimensions/Weight: 410 x 444 x 401 mm (WxDxH) / 20.26kg

The Brother MFC-L3750CDW (known in Europe as the MFC-L3760CDW) is a compact and cost effective all-in-one, aimed at small to medium business and the home office. This isn’t quite like many of the best laser printers we’ve tested. Brother calls it an LED laser printer because it’s using an array of LEDs to guide the toner particles onto the drums instead of a laser beam and this makes it appreciably smaller than Brother’s pure laser line-up. 

Thankfully, the reduced footprint doesn’t mean a reduction in functionality and you’ll find all of the key features essential for a multifunction business printer here. That includes auto duplex printing, high-res scanning and copying, a fax facility and a 50-page ADF (automatic document feed). With its laser-fast print speed and high capacity for paper and toner, this promising printer deserves an in-depth test.  

Brother MFC-L3750CDW/MFC-L3760CDW: Design & build

Brother MFC-L3750 laser printer during our tests

(Image credit: Brother)

Brother’s L37 series of LED laser printers share the same compact desktop form factor that bagged them an IF design award and the Brother MFC-L3750CDW/MFC-L3760CDW looks pretty well made to me too. It’s reassuringly heavy at over 20 kilos and the off-white plastic casing feels solid and nicely rounded off. There’s a paper tray at the bottom deep enough for 250 sheets of paper and a glass scanner bed and 50-sheet ADF at the top. The control panel with its 3.7-inch touchscreen juts out of the front. When you lift this panel, the printer hinges wide open to reveal the four fairly large toner cartridges and drum units. 

All the cable sockets are at the rear, apart from the front-facing USB Host port. I’m always glad to see one of those on a business printer for walk-up printing from a thumb drive. And behind the front flap above the paper out tray, is the multipurpose input tray for inserting single sheets, which is ideal for printing on envelopes or headed letter paper. Like many of the best printers we’ve tested, the Brother MFC-L3750CDW/MFC-L3760CDW is a typical, but tidy example of multifunction laser printer design.  

Brother MFC-L3750CDW/MFC-L3760CDW: Features & specifications

Brother MFC-L3750 laser printer during our tests

(Image credit: Brother)

As the upper middle model in Brother’s 37 series, the Brother MFC-L3750/MFC-L3760CDW has a pretty high specification and only lacks a few premium features. There’s no NFC module and it cannot auto duplex scan for example. Despite the large ADF, you will still need to turn the document over yourself in order to copy the other side. It’s a pity because rival machines like the Canon i-Sensys MF735Cx do offer single pass 2-side scanning.

What it can do is auto duplex print and copy A4 documents at 600 x 1,200 dpi. The ADF will copy a stack of 50 sheets and the paper in-tray holds 250. It comes with toner cartridges capable of printing up to 1,000 color and 1,000 monochrome pages, which is okay, but not great. However, it can accept high yield cartridges that should deliver up to 2,300 color pages and 3,000 mono and their CPP (cost per page) is very competitive.

Brother MFC-L3750 laser printer during our tests

(Image credit: Brother)

You are also getting 5GHz Wi-Fi with AirPrint compatibility, all the essential security features including Secure Print and a fax modem. And like most printer manufacturers, Brother offers a subscription service with this purchase, entitling you to discounted toner which will be sent to your address before you run out. An EcoPro sub could save up to 72% on your consumables cost.

The print speed is given as 26ppm (pages per minute), which is impressive, but that’s in simplex mode. When auto duplex printing, things slow right down to 10ppm, which is no faster than many of the best inkjet printers. The FPOT (first page out time) is an unremarkable 14 seconds.

Brother MFC-L3750CDW/MFC-L3760CDW: Setup & operation

Brother MFC-L3750 laser printer during our tests

(Image credit: Brother)

I had no trouble setting up the Brother MFC-L3750CDW/MFC-L3760CDW, which comes with a clear quick start guide. First you have to remove all of the transport tape and take out the four toner cartridges so you can reinstall them without their packaging. Next, load some paper, turn it on and follow the on-screen prompts to get your printer onto your wi-fi network. 

Brother has a good companion app called Mobile Connect for Android/iOS that will help you with this step. The app also makes remote printing and scanning easy. Operating the printer in person is simplified by the 8.8cm color touchscreen. In short, this is a very user-friendly machine. 

Brother MFC-L3750CDW/MFC-L3760CDW: Performance

Brother MFC-L3750 laser printer during our tests

(Image credit: Brother)

The Brother MFC-L3750CDW/MFC-L3760CDW printed quite quickly and well in our quality tests, with no problems or paper jams. Simplex printing is very fast, but as mentioned, the first page out time and duplex printing speeds are significantly slower, making this slightly below the average print rate for a laser printer in this class. 

Turning out plain pages of monochrome text is what this printer is best at. Each character is clearly and lightly rendered so that it’s easy to read even at very small point sizes. Printing in color takes exactly the same time, but the palette looks a little pale. The CMY toner is still vivid enough to create satisfying pages, it’s just not as punchy as other lasers at this price achieve. That’s more evident when printing photographs. Black and white shots look nicely detailed, especially on quality laser paper, but color snaps look rather flat. But then, this isn't designed to be the best photo printer. The Brother MFC-L3750CDW/MFC-L3760CDW is a business laser printer, not an inkjet, so I won’t mark it too harshly for that. 

The large 50-sheet ADF worked smoothly, drawing in a stack of pages without a hitch and copying them. It’s a pity only manual two-sided copy is available, but at least our duplicate test pages were accurate, if a little more faded than the original.   

Brother MFC-L3750/MFC-L3760CDW: Final verdict

Brother MFC-L3750 laser printer during our tests

(Image credit: Brother)

As office all-in-ones go, the Brother MFC-L3750CDW/MFC-L3760CDW ranks highly, thanks to its reasonable all-round performance. It’s not the fastest, or the most cost efficient, nor is it the best print quality, but it does each of those things well and packages it all up in a compact, easy-to-use machine that won’t break the bank. It can churn out wonderfully crisp and consistent pages of text in simplex mode, while duplex pages emerge quite slowly and colors look a little muted. There’s not a huge amount of toner in the box, but very high yield cartridges are available, which will give you a competitive cost per page. It can also make faithful duplicates with its 50-sheet ADF, though it lacks the ability to copy both sides automatically. There’s no NFC either, but it does have a decent touchscreen interface and a fair amount of room for paper and toner. All in all, the pros outweigh the cons and we have no reservations in recommending this multifunction printer as one of the best small business printers for home workers and small to medium sized organizations. 


We tested the best ink tank printers - and these are our favorite models

I tested the new Samsung S95D – and it’s OLED TV taken to the next level

The new Samsung S95D takes OLED TV's brightness to a whole new level. In 2022, Samsung shook up the TV world with the introduction of its first QD-OLED TV, the Samsung S95B. And while Samsung prefers to call its QD-OLED models simply “OLED” TVs, the company offers a unique take on the technology – specifically, the combination of an OLED display panel with a Quantum Dot layer to enhance brightness and extend color volume.

We were big fans of the S95B as well as its successor, the Samsung S95C, which took the crown as the Best OLED TV at the TechRadar Choice Awards 2023. That model introduced a 40% brightness boost and also managed to fix any issues with black-level consistency we had noted on its predecessor. And now we have the new Samsung S95D, which further pushes the brightness envelope while adding enhancements such as OLED Glare-Free technology to improve picture performance in bright rooms.

Samsung invited me to its New Jersey facility to do a hands-on test of the 77-inch version of the S95D in a living room-like space with good lighting control. During my session, I was able to make a full set of measurements and get substantial eyes-on time with the company’s new flagship OLED TV, which is very different from its predecessor due to the new anti-glare screen. Read on for my thoughts on that topic, but first, let's cover the Samsung S95D’s pricing, features and design.

Samsung S95D close up of table stand

The Samsung S95D's pedestal stand (Image credit: Future)

Like the S95C series, the S95D series is available in 55-, 65-, and 77-inch screen sizes. The Samsung S95D series gets a price bump over last year’s S95C series, though if the S95C’s history is to be repeated, those prices should start falling as early as this summer.

  • 55-inch: $2,599 (around £2,050 / AU$3,975)
  • 65-inch: $3,399 (around £2,690 / AU$5,200)
  • 77-inch: $4,599 (around £3,640 / AU$7,035)

Samsung S95D profile shot

The Samsung S95D's almost impossibly thin profile is made possible by an included One Connect box for hooking up sources (Image credit: Future)

A glare-free OLED TV 

Screen glare is a pain point for OLED TVs, which have struggled to deliver satisfactory pictures in bright room lighting conditions due to their limited brightness compared to mini-LED examples of the best TVs.

With the S95D, Samsung has dealt with that issue directly by incorporating an anti-glare screen it calls OLED Glare-Free technology. According to the company, the new tech has“no negative effects on viewing angle or contrast and no color distortion,” and having now seen it in action, I can confirm that the S95D’s screen is completely free of reflections even with room lights turned on (see the image below).

Along with new screen tech, the Samsung S95D has a new NQ4 AI Gen 2 processor to upscale lower-resolution images to 4K and make possible features, such as OLED HDR Pro to optimize dynamic range and color detail as well as Real Depth Enhancer to intelligently boost contrast on foreground objects in images.

The Samsung S95D’s audio features include 4.2.2-channel built-in speakers powered by 70 watts; Object Tracking Sound+ to create an immersive sound experience from the TV’s speakers alone while accurately locking sound effects to specific areas of the screen; and Active Voice Amplifier Pro, which intelligently boosts dialogue and sound effects to enhance their impact.

Samsung TVs regularly rank among the best gaming TVs and the S95D is no exception. Its four HDMI 2.1 ports accept a 4K 120Hz input from gaming consoles (and 144Hz for PC gaming), and there’s support for FreeSync Premium Pro. Samsung Gaming Hub offers a one-stop shop for cloud-based gaming from apps including Xbox, Nvidia GeForce Now, Utomik, and more, and the new Game Bar 4.0 menu features an AI Auto Mode option that can recognize game genres and adjust picture and sound settings automatically. I measured input lag on the Samsung S95D in Game mode at 9ms – an excellent result that slightly bests last year’s S95C.

The Samsung S95D’s incredibly slim bezel is matched with an under-11mm panel depth. While I tested the TV with its pedestal-style stand attached, it would look great mounted to a wall, which is something its One Connect box for source hookups makes easy. Like other Samsung TVs, it has a SolarCell remote control that draws and stores power from room lighting and doesn’t require batteries.

Samsung S95D showing image from Dune in bright lighting

The Samsung S95D displays an image from Dune. Note the complete absence of on-screen glare from room lighting (Image credit: Future)

The brightest OLED TV yet

Peak brightness on the Samsung S95D measured just shy of 1,800 nits, making it the brightest OLED TV we’ve tested yet. That measurement was made in Movie mode on a white window test pattern covering 10% of the screen area, while a full-screen white pattern measured around 325 nits. Full-screen brightness is another important factor for daytime viewing, and though the S95D falls short here compared to its mini-LED competition, including the new Samsung QN900D 8K TV, which measured 520 nits on the same test, the new Samsung QD-OLED’s performance improves on last year’s model.

The S95D’s color gamut coverage was also excellent, measuring 99.9% for UHDA-P3 and 89% for BT.2020. Combined with its high peak brightness, these numbers mean that Samsung’s top QD-OLED is equipped to make short work of any HDR source you throw its way (Dolby Vision excepted, since the S95D like other Samsung TVs only supports the HDR10, HDR10+, and HLG high dynamic range formats).

For obvious reasons, I started my viewing with the room lights on. It was almost uncanny how well the Samsung S95D dealt with overhead lights and lamps in the room. Black areas in pictures were free of contrast-killing reflections, and even when I stood directly in front of the screen I didn’t see a hint of my mirror image. There was also good detail in shadows when watching movie scenes, which I normally don’t expect to see in such conditions.

Samsung S95D showing image from Dune in dim lighting

The same image from Dune displayed with room lights dimmed (Image credit: Future)

As good as it looked in the light, with the room dimmed, the Samsung S95D’s picture took on a much punchier character (see the image below), with excellent contrast on HDR sources. In both environments, images had crisp detail, refined highlights, and natural-looking color.

Nonetheless, having done hands-on tests of Samsung’s new Neo QLED mini-LED TVs during the same session, I was surprised to find both color richness and contrast on the S95D slightly lacking compared to my relatively fresh visual memory of the other TVs. Was OLED Glare-Free tech the culprit? To go by the measurements alone, Samsung’s new top QD-OLED should deliver uncompromised picture quality. But it also seemed there was a slightly veiled quality to the image, though it was ultimately tough to put my finger on it.

It will take a full review to thoroughly assess the S95D’s performance, but I can confirm that Samsung’s flagship QD-OLED delivers stunning-looking pictures in both bright and dim lighting. Is it Samsung’s best TV for 2024? That question will also require further testing before making a final call. For now, let’s say that Samsung’s new screen glare-fighting screen tech works as advertised, and the rest of the S95D is equally impressive.

You might also like

Adobe Animate (2024) review

 We were pretty impressed with Adobe Animate when we looked at the animation app just over a year ago. It's a clever repurposing of Macromedia’s defunct Flash technology, turning it into a useful and fun 2D animation tool. Has a year brought in any new and interesting advances? We put the latest version of the animation software to the test.  

Adobe Animate: Pricing & plans

  • Expensive software to rent on its own, but it you already subscribe to Adobe’s Creative Cloud, then you essentially get it for free.

As with most of Adobe’s professional apps, Animate is available through either a standalone subscription or as part of Creative Cloud All Apps. Subscriptions are available as annual, monthly, or annual billed monthly (contract) plans. 

If you use three or more different Adobe apps, then the Creative Cloud option will provide a bit more value for money here, as it bundles Animate alongside other top tools like Photoshop, After Effects. and Premiere Pro.  There is no free trial of Animate, but you can cancel your subscription anytime within the first 14 days to get a full refund.

We’ve explored the different costs and discounts in our guide Download Animate: How to try Adobe Animate for free or with Creative Cloud 

  • Pricing & plans: 4/5 

Adobe Animate: How it works

Adobe Animate during our test and review process

Adobe Animate comes with loads of templates, one of which is bound to be ideal for your next project (Image credit: Adobe)
  • A highly versatile way to easily animate 2D objects, even those not designed for animation - and it’s great fun to use.

Adobe Animate is a good and fun app to perform anything from quick to highly complex 2D animations, either using existing artwork or creating it right from within the app itself. Not to be confused with Adobe’s simple 2D digital puppeteering app, Character Animator. 

In Animate, you have complete freedom to use the software as you see fit, such as drawing each frame manually, or use the motion tween tool to automate the process (while removing a bit of individuality from the process).

In order to get started, you’re offered a series of templates, from standard 16:9 resolutions, to banner ads, various social media platforms, game consoles, web pages, the list is impressive, but if none of that suits, you’re free to customize your canvas however you see fit.

All the tools you’d expect to animate anything are there, such as keyframes, onion skinning, the works. The flexibility is quite impressive, giving you a lot of freedom when it comes to creating unique shapes, but the part we liked the best is the app’s Asset Warp tool. This allows you to add motion to an object that wasn’t originally designed for such a process - like a photo of a figurine on a transparent background, for instance. This exoskeleton informs Animate how the object’s various sections are connected to each other, enabling you to move them… within limits: if the angle means you can’t fully see one of the figure’s limbs, this method won’t magically make it appear; you can animate what you see. Nothing’s stopping you however from creating that limb from scratch, connecting that creation to the photo and controlling its movements.

When it comes to exporting your work, you’ve got a handful of options, namely sharing it directly to YouTube and Twitter (yes, at the time of review, the software still calls it Twitter), or exporting it as an .mp4 or .gif file, which you can then use anywhere you wish.

  • How it works: 4.5/5 

Adobe Animate: New features

Adobe Animate during our test and review process

Adobe Animate is all about 2D design - you can import already created assets, or create them from scratch within the interface (Image credit: Adobe)
  • Welcome improvements for sure, but the list is very paltry, and what’s actually changed, although ok, doesn’t feel like it’s worth a full numbered version upgrade. 

Animate was already surprisingly versatile and powerful as it previously was, so what wonders did Adobe introduce with the latest major upgrade? Well, it may depend on which platform you’re using the software on: there are three updates being advertised, the first of which is native Apple Silicon support. 

That’s right: Animate works natively on all the best MacBook Pro laptops and Macs with M1 to M3 chips. According to the advertising, not only will this lead to smoother drawing when compared with Intel Macs, but the app itself will launch faster, your project will export up to twice as fast, and your timeline will playback up to three times as fast. Very welcome, especially for professional creatives, but nothing to get too excited about. After all, the original M1 chip was introduced in November 2020. That’s a long time to wait for a native app from one of the most successful professional software developers in the world. Still, it’s here now, so mustn’t grumble, I guess.

Adobe Animate during our test and review process

Adobe Animate’s new interface may be ‘sleek’, but the changes are remarkably subtle compared to what was present in the previous version (Image credit: Adobe)

Next up, is a “sleek user interface”. Hearing about this got us pretty excited. After all, Animate’s previous interface was excellent, and extremely customizable, letting you tear off tabs, keep them as floating windows, or dock them elsewhere in the interface. But there’s always room for improvement. So what did they give us? We have to admit, we had to look pretty closely and make sure we were actually running the latest version. Essentially, all the windows are slightly more compressed, leaving more room for the main preview section, helping you focus more easily on what you’re designing. Again, this is great, but the change is subtle. Put the previous interface next to the current one, and it might take you a few seconds to figure out which is which. But more room to preview your work can only be a good thing.

Adobe Animate during our test and review process

Adobe Animate does have a new tool that comes with this new version: the ability to reset a warped asset to its original shape - useful for sure, but is it really worth a full numbered version upgrade? (Image credit: Adobe)

And our third tentpole new feature is the ability to reset a Warp Asset. Warp Assets are the secret sauce behind Animate’s ability to give motion to still images that weren’t initially designed for movement. Once you’ve created a skeleton frame of sorts, you can stretch and bend your image to give it the illusion that it’s moving. Subtle changes are usually best so as not to distort the image too much, which would make the motion feel unnatural, but how far is too far? There’s always been the potential for concern to experiment too much, and then having to manually move the frame back to its original settings. Until now. Thanks to this latest version, you can find the ‘Reset Warped Asset’ button to the right of a selected object’s ‘Warp Options’, in the Properties’ Object tab.

These really feel like very minor improvements, hardly worthy of a full version number upgrade. However, this shouldn’t detract you from the appeal of an app that was already pretty excellent to begin with - overall, one of the best animation software we’ve tried.

  • New features: 3/5 

Adobe Animate: Scorecard

Should I buy?

Adobe Animate during our test and review process

(Image credit: Adobe)

Buy it if...

You need to animate static objects in 2D, you need something that’s powerful yet easy to use, with a bunch of original tools, and ideally you already subscribe to Adobe’s Creative Cloud.

Don't buy it if...

 You’re not already an Adobe subscriber, or you want even more control over effects, as in After Effects or any of the best Adobe After Effects alternatives


We tested the best laptops for graphic design - and these are our top picks

Adobe Creative Cloud (2024) review

Adobe Creative Cloud is the hub of your Adobe existence. This is where you can launch any Adobe app you’ve installed on your computer (probably the most superfluous feature in its arsenal), where you can find and install new ones, review any files you’ve saved on Adobe Cloud. It's also a space where you can find tutorials for top Adobe apps, and browse the stock media libraries of Adobe Stock. The interface has had a major makeover since we last reviewed the app, so we thought it was time to delve back in there and see how this nexus of activity works in 2024.

Adobe Creative Cloud: Pricing & plans

  • Creative Cloud itself is free, but you need it to manage your other Adobe software, and for that, you need a subscription. It’s not cheap, but it might offer value for money. 

Adobe Creative Cloud in use during our tests

You can’t do anything with Creative Cloud unless you login (Image credit: Adobe)

In and of itself, this software is free. You will need an Adobe ID to make use of it, but that’s also free. After that, you have to choose a subscription plan to grant you access to some, most or all of Adobe’s portfolio. The prices vary depending on whether you’re an individual, in education, or a business, but for illustrative purposes, we’ll be looking at costs for individuals here. 

Most apps, the top of the line ones such as Photoshop and Premiere Pro, will each cost you $23 per month. There is some fluctuation though: Adobe Acrobat Pro is $20, Adobe Express $10. If you want access to most of Adobe’s portfolio via its ‘all apps’ package, you can do so for $60 a month.

These prices are for what Adobe calls ‘annual billed monthly’. This is effectively a 12-month contract, paid each month. Monthly subscriptions are available, but are more expensive. Annual upfront subscriptions are the cheapest way to access Creative Cloud. Certain apps offer you a free trial, but you can also get a refund, as long as you cancel your subscription within 14 days.

  • Pricing & plans: 4/5

Adobe Creative Cloud: The Apps

Adobe Creative Cloud in use during our tests

The Home page offers you a few customizable shortcuts (Image credit: Adobe)
  • This is the core of the app’s purpose, and it does a fantastic job at managing your software. You can install new ones, delete others, and update them all, in a very easy to use interface.

Adobe Creative Cloud has evolved since we last visited it. Everything feels more streamlined, which makes it easier for you to find what you’re after. For instance, the sidebar’s main focus used to be on categories, letting you choose ‘Photography’, or ‘Video’, or ‘3D' for instance. There was also a dedicated Fonts section there, which was superfluous since you also had a Font button top right of the interface. So gone is the old sidebar, and in with the new.

You now start with a Home button, showing you pre-assigned shortcuts to apps you’ve installed on your machine (this is customisable), followed by current information about relevant apps, a view of the latest files you’ve stored on Adobe Cloud, and quick links to Adobe Express, and Firefly - the AI art generator and assistant that’s infused across Adobe products.

Adobe Creative Cloud in use during our tests

This is the nexus of the app, where you manage all the pro Adobe software you have on your computer (Image credit: Adobe)

Next is ‘Apps’, where you may well be spending most of your time. Here, you can manage all your available Adobe software, from installing new ones, to removing others, and keeping them all up to date. 

We appreciate the fact you have full control over such updates, from manually choosing what gets updated, to letting Creative Cloud download and install everything as it gets released. When it comes to major updates, you can also choose to keep the old version as you install a new one, a crucial feature if you’re currently working on a project, and don’t want to risk the new changes unintentionally messing up your work, while also staying up to date.

  • The apps: 5/5

Adobe Creative Cloud: Tutorials

Adobe Creative Cloud in use during our tests

The Discover page has a lot of useful information, including tutorials and links to Adobe’s Community forum (Image credit: Adobe)
  • Having a place where you can learn more about some of Adobe’s apps is most welcome - but links force you out of the app and into your web browser.

The ‘Discover’ section isn’t new. In fact, it had its own menu top left of the interface in the previous version, although that menu was pretty subtle and easily missed. Now however, it’s much more front and centre, having its own dedicated space on the left sidebar. This makes it much easier to find and explore.

Seven apps are covered, including Acrobat, Photoshop, Premiere Pro, and Adobe InDesign, and through Discover, you get access to video tutorials, tips and tricks articles. You can also get support from Adobe’s community. Although most videos and live streams can be accessed from within the Creative Cloud interface, clicking on the other two will take you out of this software, and into your web browser. It’s not ideal, and we did find it somewhat disruptive, but the concept and (most of) the implementation is fine. 

  • Tutorials: 3/5

Adobe Creative Cloud: Stock media

Adobe Creative Cloud in use during our tests

A nicely laid out page which merely send you to your web browser should you click on anything (Image credit: Adobe)
  • The ‘Stock & Marketplace’ section looks great and appears to be full of features, yet everything you click on just takes you to your web browser. 

Another important facet of Creative Cloud is its link to Adobe Stock. Click on ‘Stock & Marketplace' to be graced with a busy interface. You’ve got tabs at the top representing various categories, such as Photos, Audio, Templates and Plugins, followed further down by a large search field with the ability to filter your results, and after that, a long list of featured items, represented by large thumbnails.

All this sounds great, but it’s all just a veneer: no matter what you type on, you’ll be taken to a new page in your web browser. Even the search field is window dressing, and typing anything in it also directs to the browser. It’s not the most user-friendly interaction, forcing you to juggle between two apps. Because of this, it feels unfinished, like one of those old Western movie towns, where everything is just facades of buildings, with nothing behind them.

All in all, Creative Cloud is most useful to keep track of the Adobe apps you’ve installed on your computer, but there are other features which could make it attractive for those seeking information and new media for their project. It’s a shame though that more often than not, Creative Cloud will still take you to a web browser, which is never an ideal interaction. Still, it’s an improvement over the previous version, and the sidebar, and the layout of the information is better than ever. It’s an invaluable control centre for Adobe’s apps, but it could be so much better when it comes to the additional features.

  • Stock media: 3/5

Adobe Creative Cloud: Scorecard

Should I buy?

Adobe Creative Cloud in use during our tests

Check which apps need updating, and which version to keep (Image credit: Adobe)

Buy it if...

You have an Adobe subscription, need to manage its apps installed on your computer, browse for relevant information, and look for additional media. 

Don't buy it if...

You're not an Adobe user - and don't need access to all apps and tutorials.


!!!!!!!!!!

Popular Posts

Categories

Blog Archive