Friday, September 30, 2022

SteelSeries Arctis Nova 7 Wireless

SteelSeries Arctis Nova 7 Wireless: One-minute review

If you’ve gotten a glimpse of the Steelseries Arctis Nova 7 Wireless, you’ll know that this is more than just the Arctis 7 with a fresh coat of paint. It may retain its predecessor’s general design but the ear cups and the headband are both slimmed down for a sleeker, more ergonomic package. It’s no wonder that it’s 14% lighter.

There are plenty of changes beyond just its aesthetics as well. It can connect to multiple sources simultaneously. It has fast charging capabilities. And, it has the kind of sonic customization thanks to the Sonar software suite that will let you customize the sound beyond anything you could have done with the Arctis 7. Of course, it still keeps some of the previous model’s DNA, good and bad, including that slightly weak bass. there’s enough to like that you might consider upgrading even if you own its predecessor.

Though it doesn’t quite reach the same aural heights as the SteelSeries Arctis Nova Pro Wireless, the Arctis Nova 7 Wireless is still a stellar entry into the oversaturated world of gaming headsets even if it costs a little more than it should. 

SteelSeries Arctis Nova 7 Wireless: Price and availability

  • How much does it cost? $179 (£174, about AU$310)
  • Where is it available? Available now
  • Where can you get it? Available in the US, the UK, and Australia
SteelSeries Arctis Nova 7 Wireless: SPECS

Interface: 2.4GHz wireless, Bluetooth, 3.5mm
Compatibility: Windows, Mac, PS4/5, Meta Quest 2, mobile devices
Mic: Bidirectional noise-cancelling
Surround sound: Microsoft Spatial Sound / Tempest 3D audio for PS5
Weight: 11.45oz (325g)

The SteelSeries Arctis Nova 7, which entered the marketplace late August 2022, is far from the cheapest of SteelSeries’ Nova gaming headsets. That honor goes to the much more stripped down Arctis 1, which goes for $59 (£59, about AU$69). And, though it’s not the most expensive either, it will set you back a decent amount with a price tag of $179 (£174, about AU$310).

Along with the 7P and 7X, the console-oriented versions of the same headset, it’s a solid performer all around. And, you can certainly find worse headsets for the price. But, considering the competition and what it offers, a price tag closer to $150 / £150 would be more appropriate.

Of course, the most expensive Nova headset, the Nova Pro Wireless, does go for $349 (£329, AU$649). However, it comes with such a wow factor that we would gladly pay that much for it.

  • Value: 3.5 / 5

SteelSeries Arctis Nova 7 Wireless on a white coffee table

(Image credit: Future / Michelle Rae Uy)

SteelSeries Arctis Nova 7 Wireless: Design

  • Plenty of personalization available
  • Clamping force is a little too light
  • Compatible with most devices

Though the Steelseries Arctis Nova 7 Wireless is more than just a light refresh, you can still see the general outline of previous Steelseries headsets in its design. The ear cups are oval where they meet the ear pads and the headset still comes with replaceable personalizable ski goggle headbands and ear cup plates. It also uses similar materials, namely durable feeling plastic for the earcups and metal for the headband, PVD-coated steel in the case of the Nova 7.  But, that’s where most of the similarities end.

Unlike the Arctis 7, the ear cups are thinner except for the raised circular portions that house the replaceable ear cup plates. These plates, which are small and circular, act as more of an accent instead of covering the entire outside surface as the ones on the Arctis 7 do. 

Meanwhile, the steel headband is slimmer, as are the ski goggle headband inserts. They only need to be clipped into place on the inside, abandoning that iconic velcro-ed, wrap-around design.

SteelSeries Arctis Nova 7 Wireless on a white coffee table

(Image credit: Future / Michelle Rae Uy)

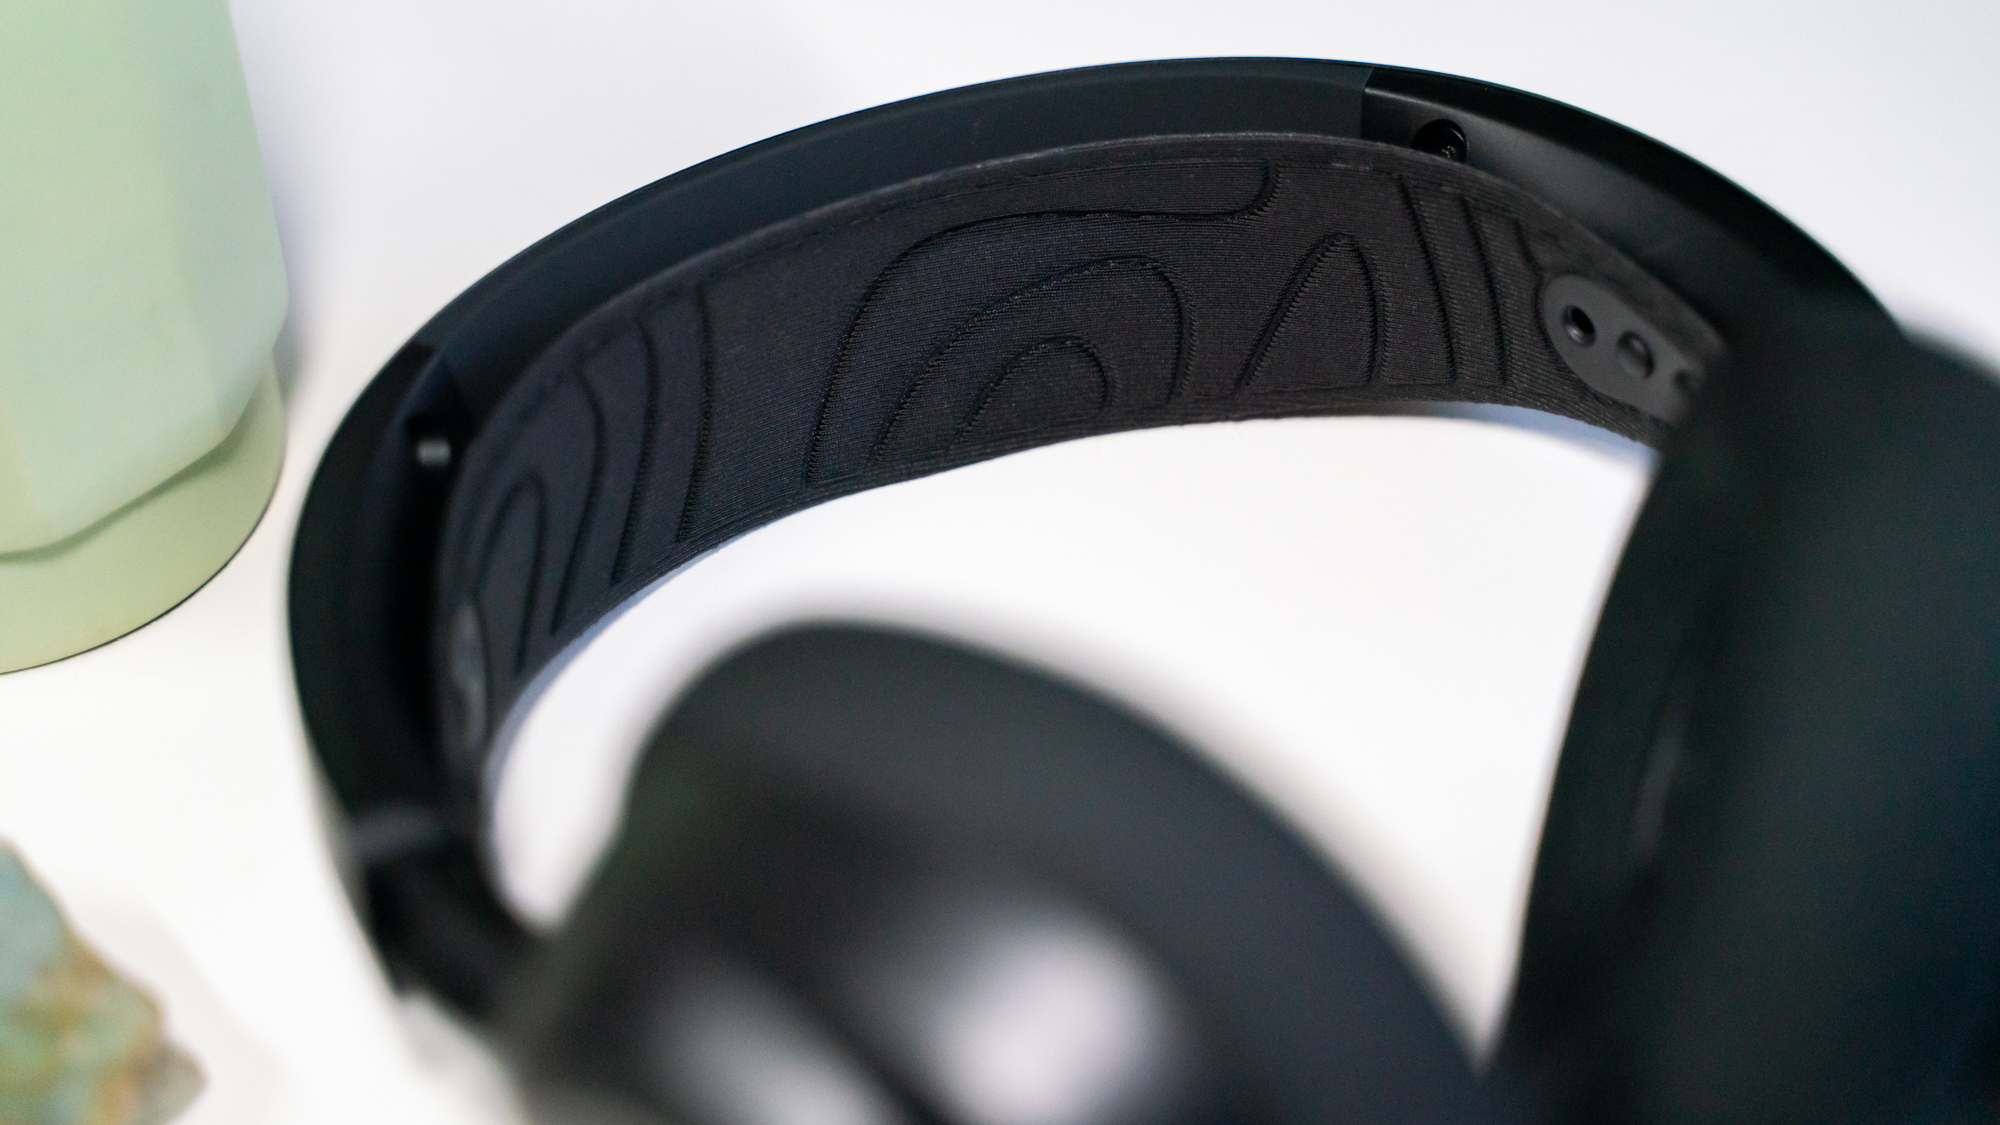
Both the ear cups and ski goggle headbands are completely replaceable with a number of different colorways available from Steelseries, though you’ll have to purchase them separately, allowing you to personalize the Nova 7 Wireless far beyond what you can do with most headsets.

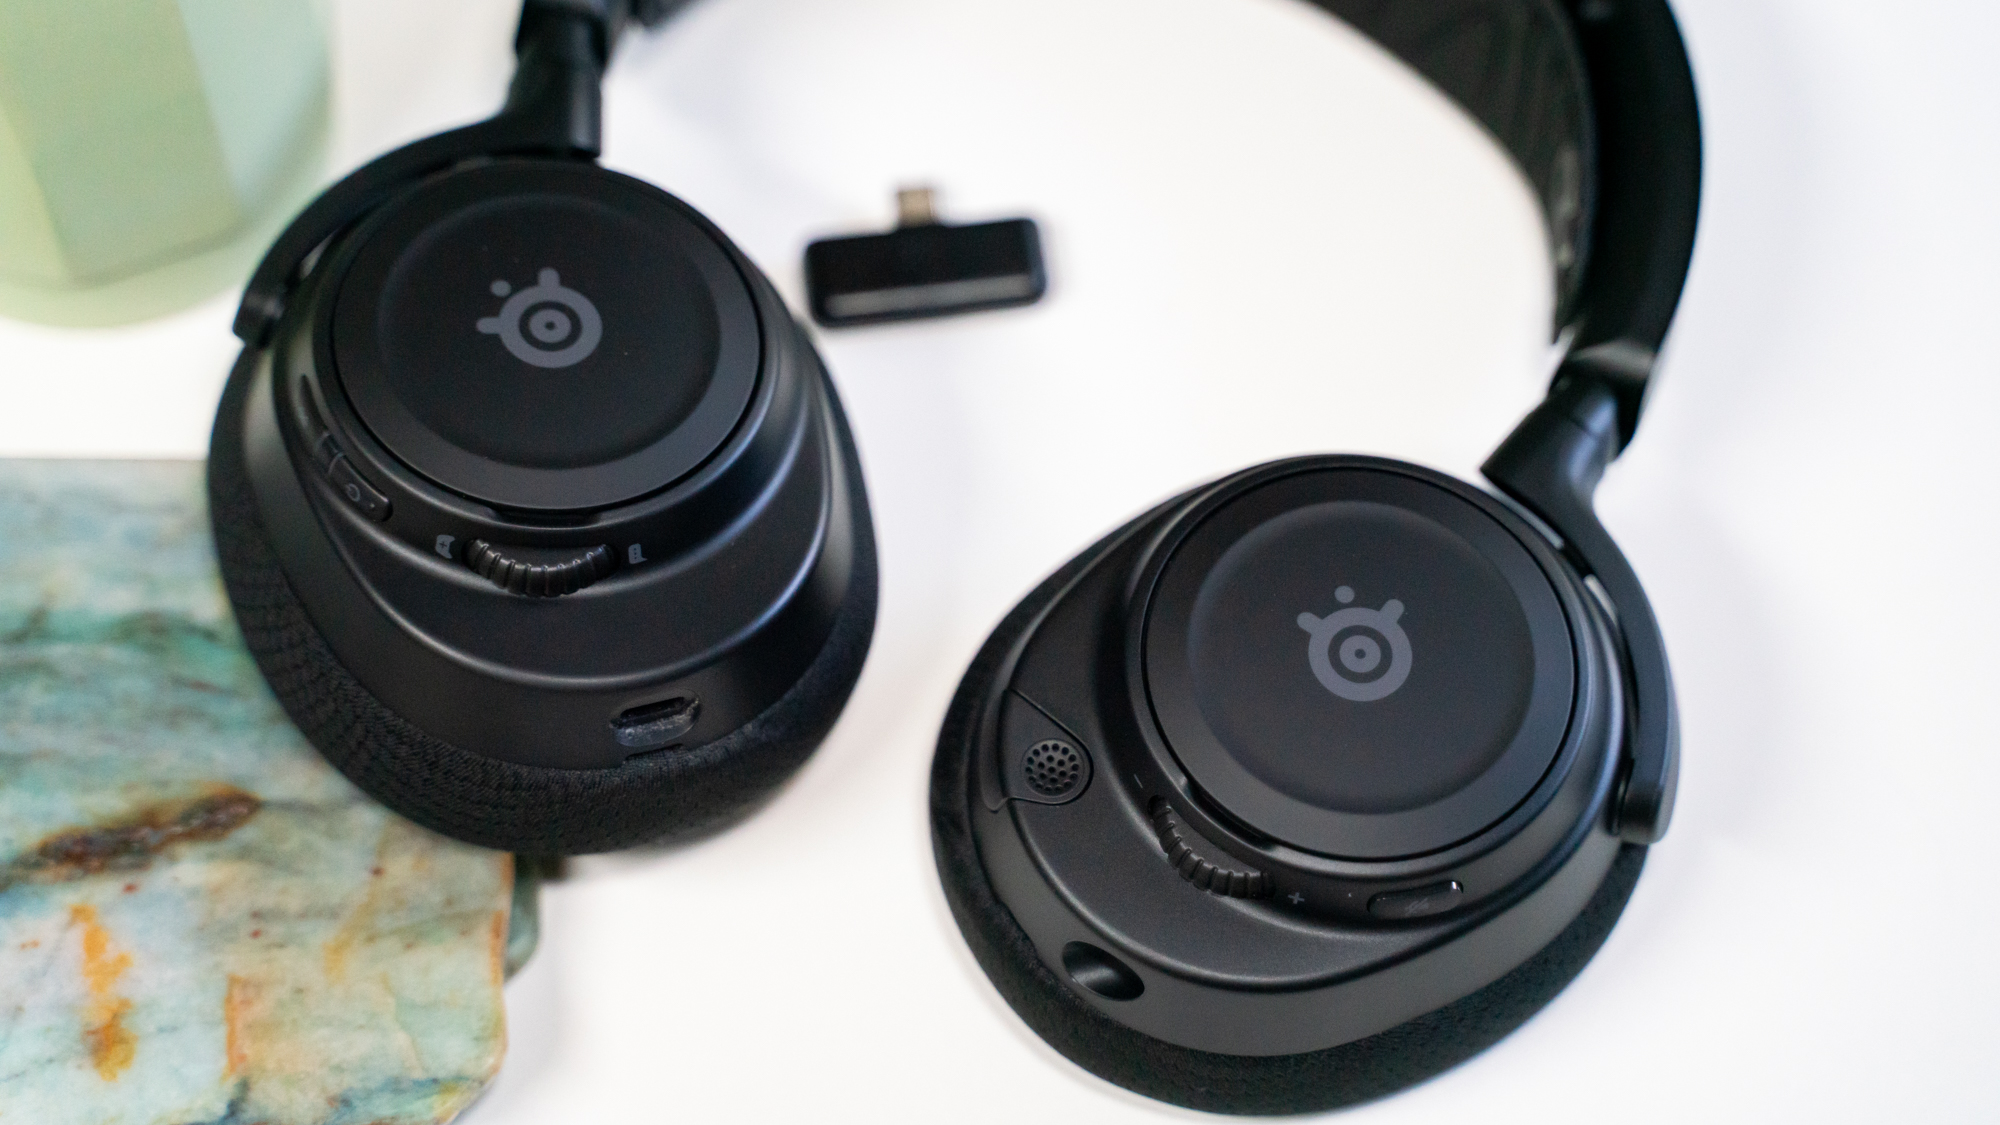
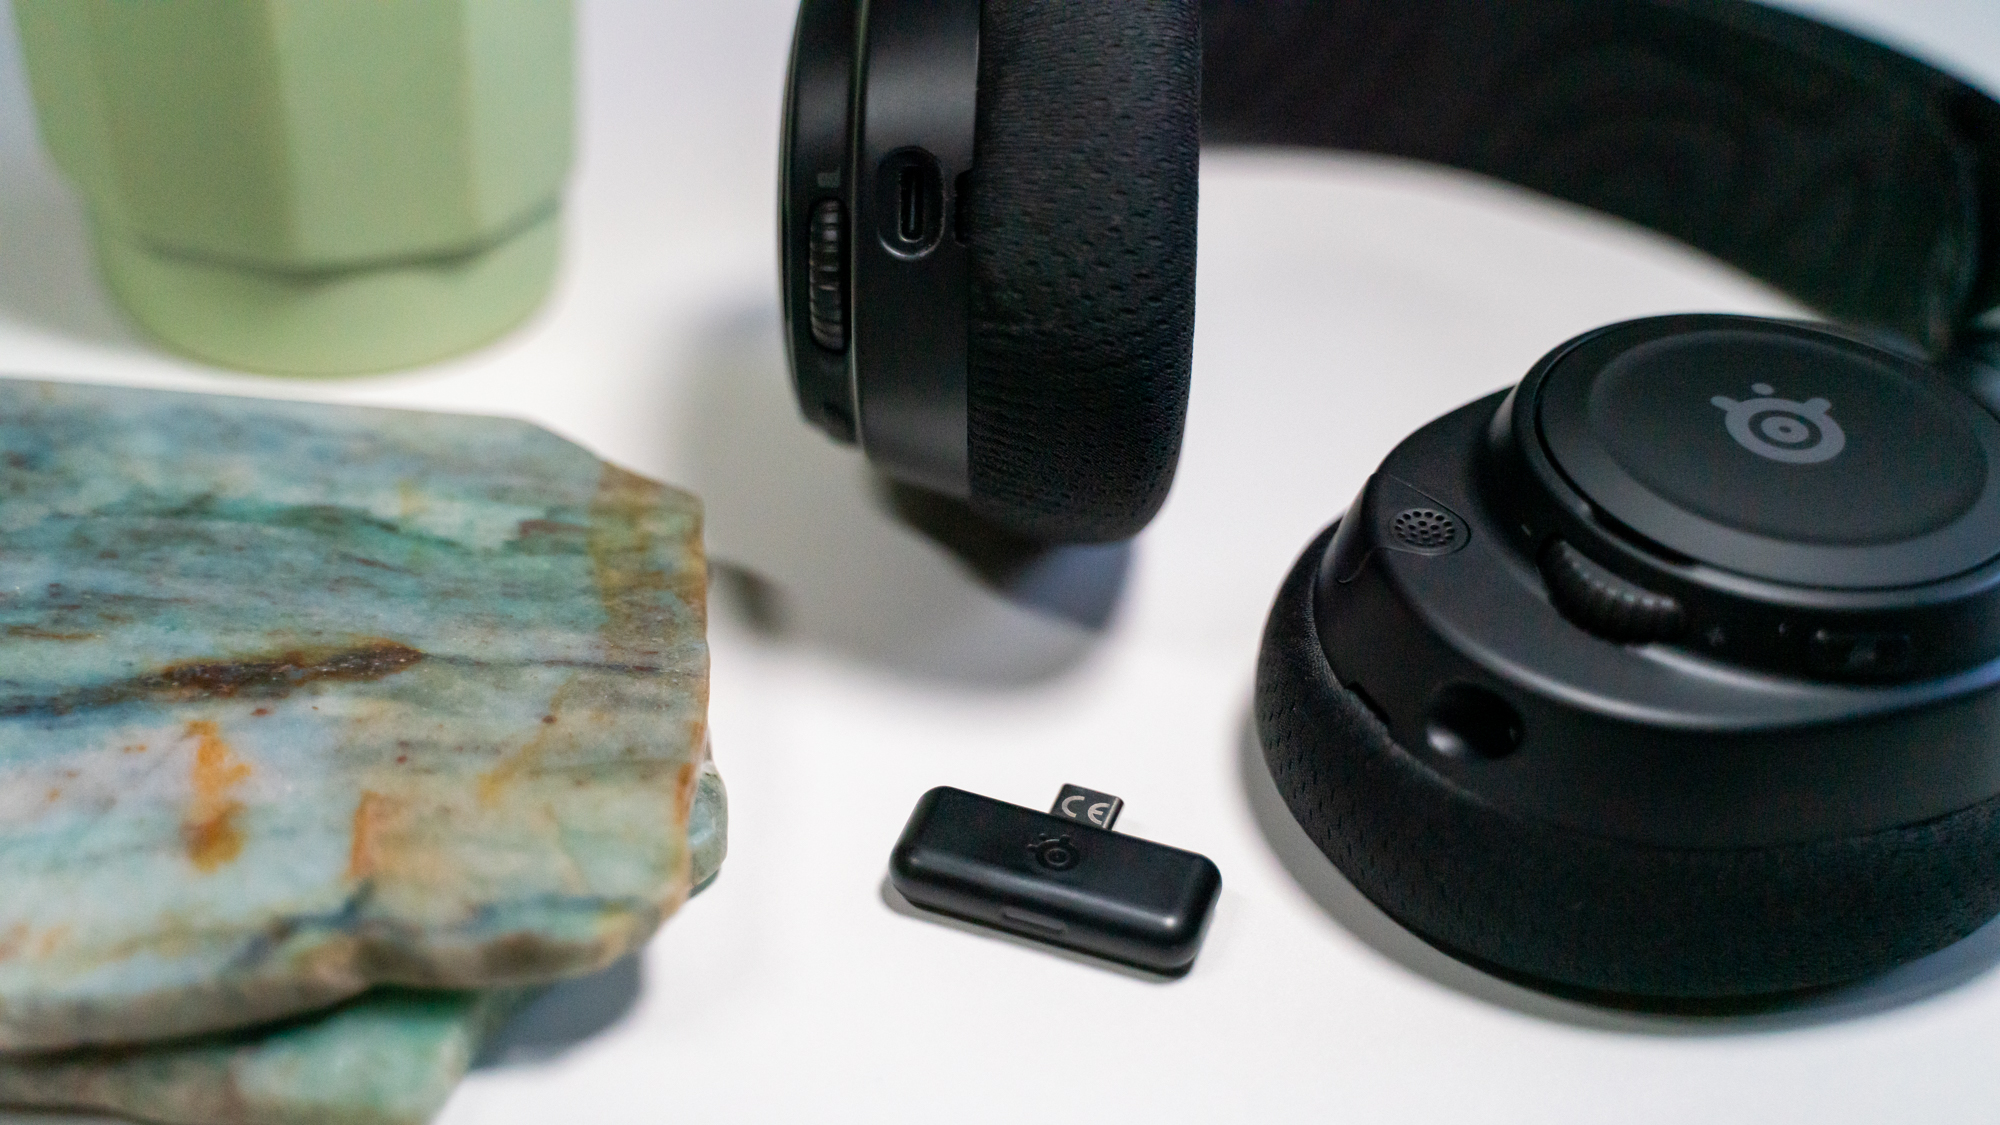
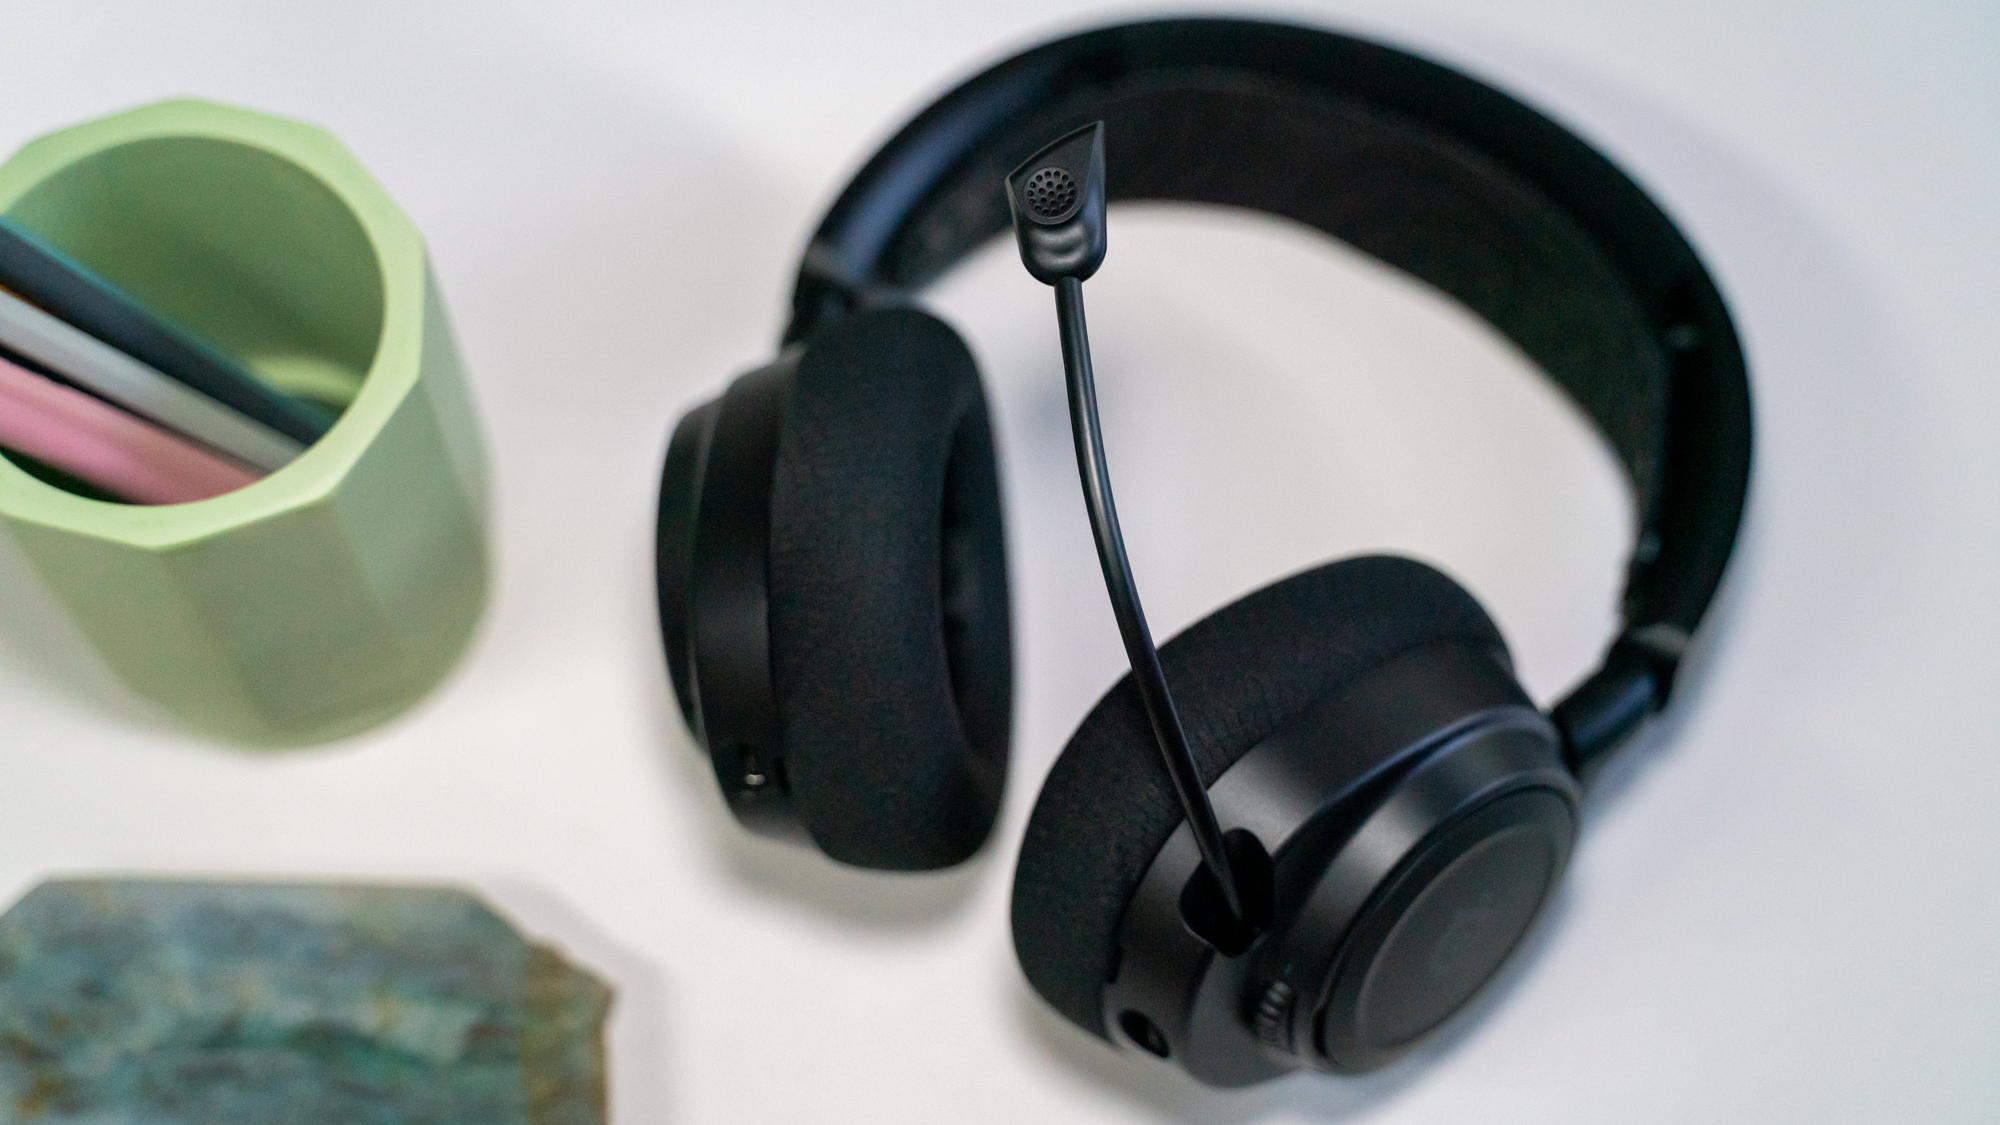
All the controls you could want are at your fingertips as well. The right side houses the power and Bluetooth buttons as well as the chat mix and USB-C port while the left side has the mic mute, volume dial and 3.5mm audio jack on the left. The retractable mic is also on the left ear cup and sits completely flush when stowed away.

Ergonomically, there’s enough swivel and height adjustability to accommodate just about any head shape. You can even swivel the ear cups flat if you want to throw them in a backpack. When wearing the Arctis Nova 7, however, we find it has one glaring issue. There isn’t enough clamping force to keep it in place during intense moments. When we move our head quickly, it slides around a bit. While it doesn't fly off, we would have preferred a little tighter fit. After all, you can loosen a headset’s clamping force but you can’t tighten it.

SteelSeries Arctis Nova 7 Wireless on a white coffee table

(Image credit: Future / Michelle Rae Uy)

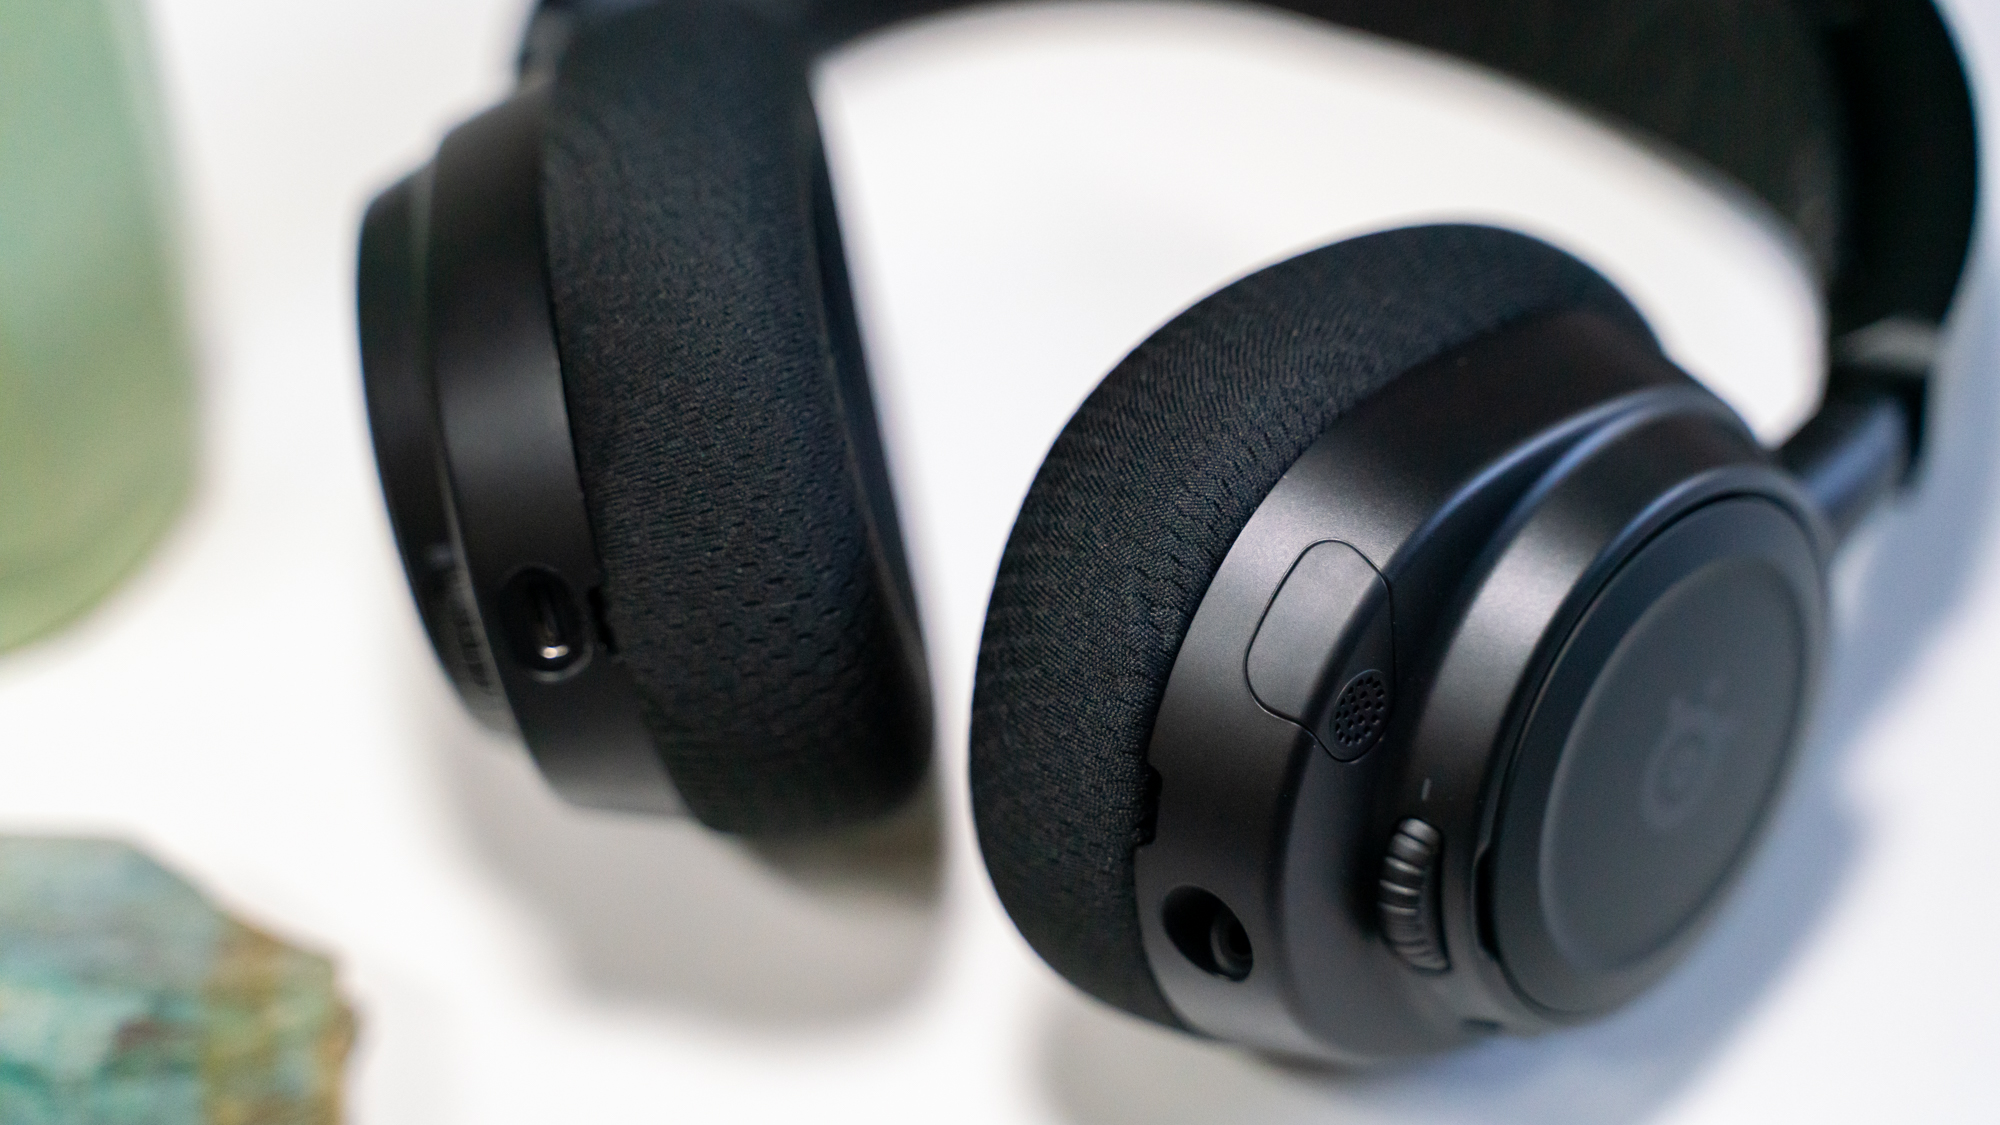
It’s still surprisingly comfortable to wear despite that one issue. The ski goggle headband keeps the steel band from putting pressure on your head while the airweave memory foam ear pads are plush and keep you from feeling any fatigue even after wearing it for long periods of time. Of course, having tested the Nova Pro Wireless as well, we much prefer the soft leatherette covering of the Pro to the coarser cloth covering the ear pads here. Considering the price, a softer fabric would have given it better value.

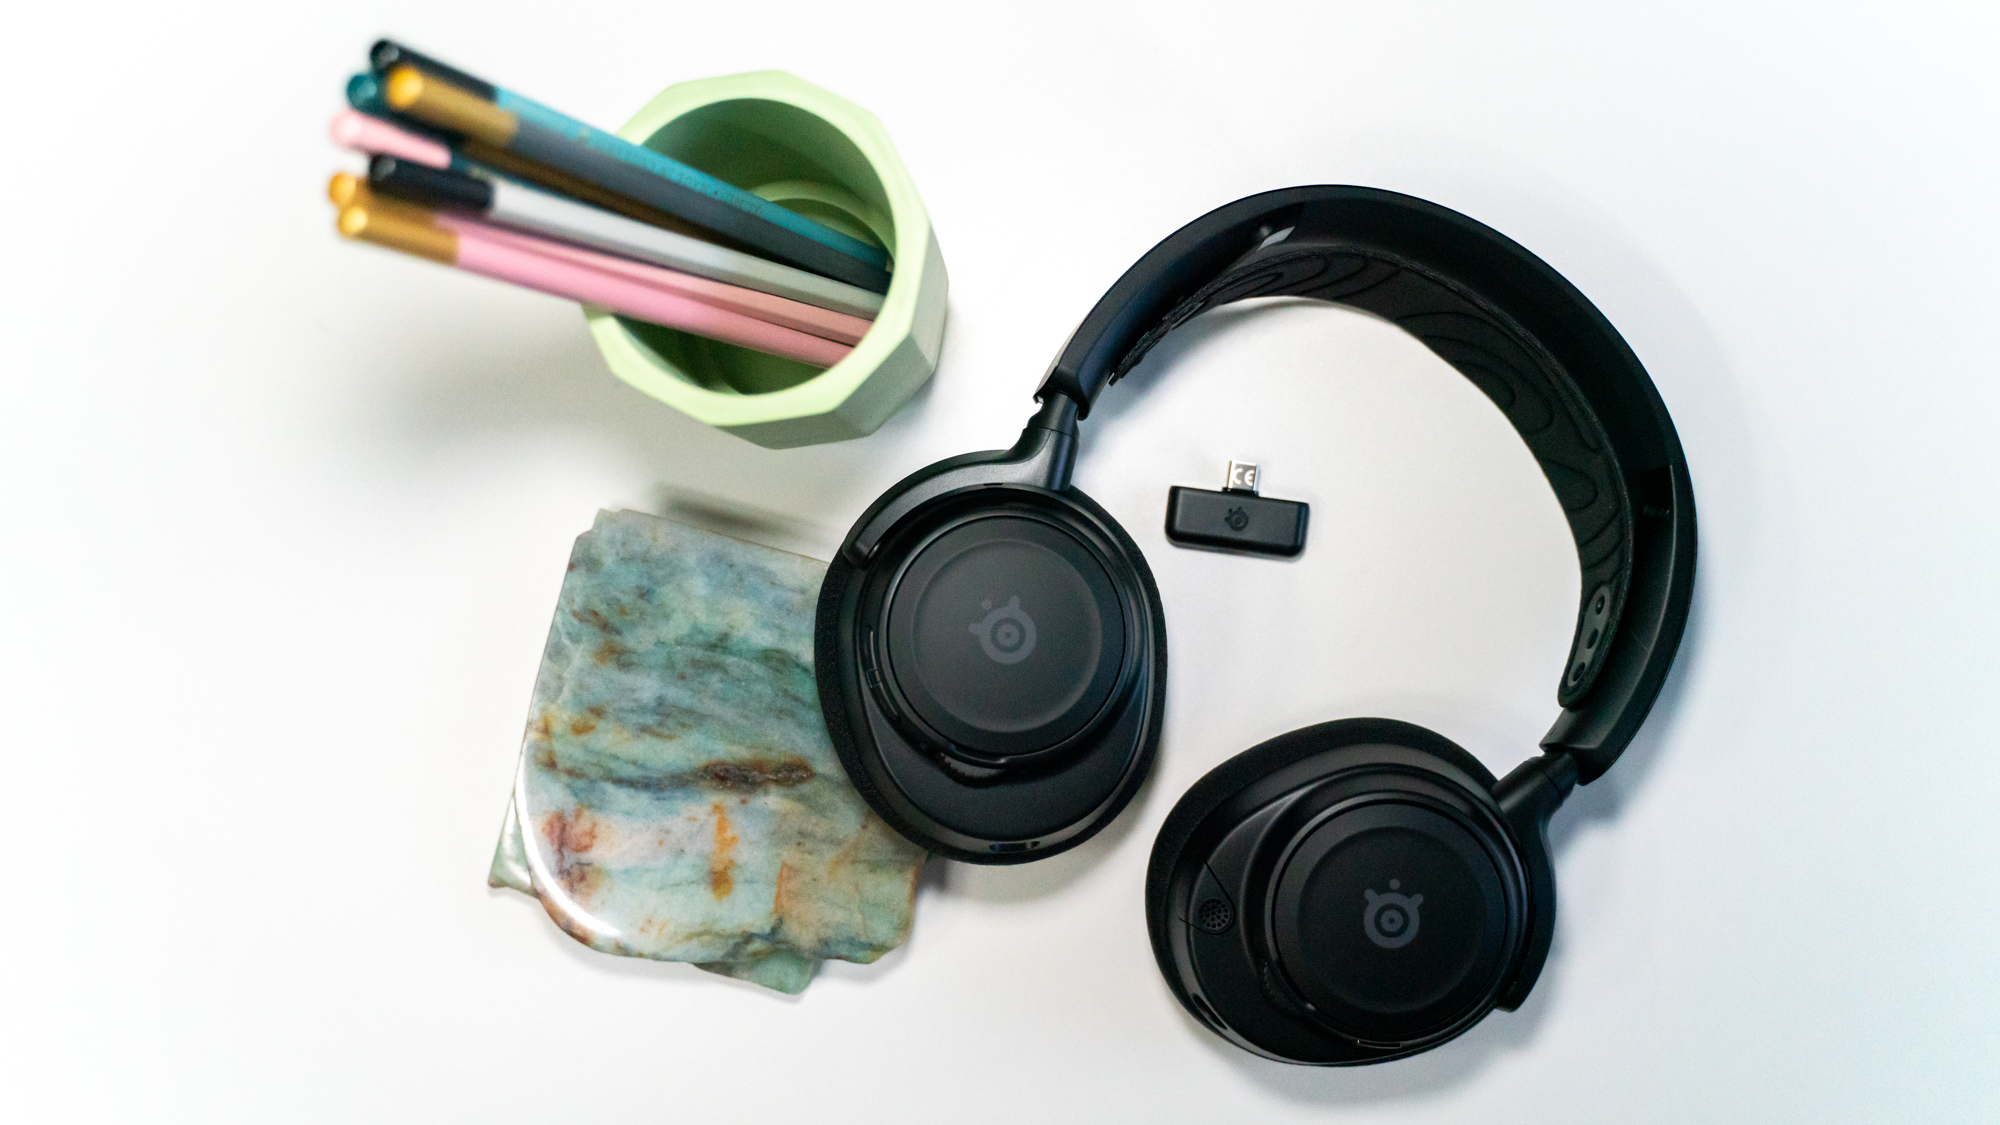
Considering all the connectivity on the Nova 7 Wireless, it’s no surprise that you can basically hook it up to just about any system. The USB-C dongle lets you use the headset with a PC, Playstation, or Switch while you can use the Bluetooth capability for Mac, tablets and phones. Of course, you can also connect it to any analog device thanks to the 3.5mm connection.

One of the benefits of having that wide range of connectivity is the ability to connect to multiple devices at once. And, Steelseries has made that a feature here. Its multi-device, multi-platform support lets you connect to a wireless source and Bluetooth source simultaneously, so you can take that important call in the middle of a battle without having to grab your phone.

Since it has that simultaneous connectivity, Steelseries has decided to include separate buttons for power and Bluetooth. If you’re connected to a Bluetooth source and use the power button to power off, the headset will still receive that Bluetooth signal. You have to press that Bluetooth button to power off.

If you’re hoping to use this for anything else, it also comes with a 3.5mm for wired connectivity. In essence, you can connect the Nova 7 Wireless to just about anything. Though, if you want wireless connectivity to an Xbox, you need to get the Nova 7x instead.

  • Design: 4 / 5

SteelSeries Arctis Nova 7 Wireless on a white coffee table

(Image credit: Future / Michelle Rae Uy)

SteelSeries Arctis Nova 7 Wireless: Performance

  • Very good, if a bit too neutral, sound quality
  • Plenty of battery life including fast charging
  • Good sounding mic

There are headphones and headsets that sound more fun with boosted lows and highs, and then there are ones with a more neutral sound. The SteelSeries Arctis Nova 7 sits firmly in the latter camp. The mids are just right while the low-end is present enough for you to feel them, even though they’re a bit quieter than we prefer. Meanwhile, the high-end is detailed if slightly veiled.

We’re able to hear everything clearly and as intended. It won’t compare to the cleaner and punchier sound of the SteelSeries Arctis Nova Pro Wireless. But, it gives pretty accurate audio that’s immersive once our ears adjust to the more neutral sound.

SteelSeries Arctis Nova 7 Wireless on a white coffee table

(Image credit: Future / Michelle Rae Uy)

Along with audio quality, mic quality is a crucial consideration with headsets. The boom mic sounds loud, clear, and very present with only a tiny bit of compression on the voice. Essentially, it sounds very good. It does pick up background noise but not at a volume that’s distracting or will affect how well others hear our voice. And, there is some AI noise cancellation available via the software.

When tested, we’re able to also use the mic without retracting it from the earcup. Of course, the mic quality suffered a bit. Our voice still comes through clearly, but it’s not as loud, a bit more compressed, and sounds like it’s farther away. It also picks up much more background noise.

The battery life is also an important factor. Luckily, it’s pretty stellar here. While you won’t be able to hot-swap batteries as on the Pro Wireless, the Steelseries Arctis Nova 7 Wireless does give you 38 hours of battery life. That’s about five days of gaming if you put in eight hours a day. It also offers fast charging via its USB-C. With just 15 minutes of charge, you can get an extra six hours of use.

We’re also impressed with some of the software-related features that come with the Arctis, notably the new Sonar Audio Software Suite. It’s an add-on to the SteelSeries GG Engine and gives you a ton more control. You can adjust mic volume, game volume, chat volume, chat mix, and much more. You can also turn on the ClearCast AI noise cancellation here. 

Most importantly, it gives you access to a parametric EQ. This means that you can not only adjust the boost or cut of individual EQ bands but also change which frequencies you’re adjusting as well as add more bands to play with. This is much deeper and customizable than the usual five-band EQ that most headsets give you access to. Just be aware that these customizations are only available when you’re plugged into a PC and using the app.

  • Performance: 4 / 5

Should I buy the SteelSeries Arctis Nova 7 Wireless?

SteelSeries Arctis Nova 7 Wireless on a white coffee table

(Image credit: Future / Michelle Rae Uy)

Buy it if...

Don't buy it if...

Also consider

SteelSeries Arctis Nova 7 Wireless: Report card

Value While the Nova 7 Wireless is a very solid headset, and better than much of the competition, we think it should be just slightly cheaper. 3.5 / 5
Design It’s a versatile and sleek headset. It’s also lighter than its predecessor. 4 / 5
Performance It sounds good with a good quality mic, excellent battery life and some great software customization. 4 / 5
Total While a bit on the pricey side, it’s a great all-around headset that will impress most. 4 / 5
  • First reviewed September 2022

How we test

We pride ourselves on our independence and our rigorous review-testing process, offering up long-term attention to the products we review and making sure our reviews are updated and maintained - regardless of when a device was released, if you can still buy it, it's on our radar.

Read more about how we test

SteelSeries Arctis Nova 7 Wireless on a white coffee table

(Image credit: Future / Michelle Rae Uy)

PhotoRec

Most photo recovery software is enterprise-focused, so you’ve got to buy to use properly, but PhotoRec is an open-source alternative that combines its free price with solid features.

Its open-source status doesn’t just mean that it’s free, either. That designation means that people can view, access and contribute to the app’s development.

You’d be remiss to look down on this app because of its free stature. In many key areas, the data recovery software features mirror or even exceed the abilities you’ll find in premium products. 

PhotoRec: Plans & pricing

  • It’s free - when it comes to affordability, you can’t say fairer than that 

This is an open source app, so it’s free to use – just like TestDisk. Indeed, if you download one, you’ll get the other included in the package. And don’t expect any different plans available elsewhere, as this is one product with one set of features.

If you do use PhotoRec for restoring your photos and you’d like to contribute to the developer, there’s a PayPal button for donations on the website.

  • Plans & pricing: 5/5 

PhotoRec: Features

  • A very basic range of features, albeit with decent file format support 

There’s no getting around a particular elephant in the room when it comes to PhotoRec: this is not a good-looking or modern application. Load this tool and you’ll be greeted by an interface that looks like it should be at home on an older version of Windows. Almost every free and paid photo recovery app looks sleeker and more sophisticated.

Don’t judge PhotoRec by its interface, though – and concentrate on the features instead. This app can recover files from nearly 500 different formats, which is a broader range of support than some paid products offer. If you drill down towards photography, you’ll find recovery capability for every mainstream imaging file, RAW files, and files from big imaging businesses like Adobe, Olympus, Apple, Nikon and Canon.

If you’re unsure whether PhotoRec can find your lost photography, there’s an online analysis tool that will tell you if this app can find the media – head here to upload another file with the same format and give it a try.

That’s a solid start, and PhotoRec impresses elsewhere. It works with hard disks, SSDs, storage cards, flash drives and optical media, and works with lots of popular digital cameras. It works with all major Windows and Apple file systems, too, and even popular Linux file systems. And, as it’s open source, you can even download and compile the source code yourself if your system of choice isn’t officially supported.

Screenshot of photo recovery app PhotoRec

(Image credit: CG Security)

The interface might not look like much, but it’s relatively easy to use for anyone with tech experience. Load the photo recovery software and you’ll see a list of potential drives and devices, and you’ve got to choose a destination folder for any restored pictures. The scan dialogue will be familiar to anyone who ran defragmentation tools on older versions of Windows, and as the scan runs you’re given a list of what files have been found and restored.

The app does lose out thanks to its interface design, though. The initial list of drives includes all partitions, which could prove tricky for people who aren’t tech-savvy, and most other apps don’t require users to specify folders to store recovered photos. Don’t expect much in the way of customer support, either – there’s a forum and an FAQ, but that’s it. That’s tricky enough for home users and precludes PhotoRec from finding a home in a business environment.

Scanning is reasonably fast, but there’s little help when the scan finishes. You can click a link in the app to open the folder you chose or navigate to it yourself, but you’re just given a directory of all of the recovered media. You’ll have to browse through that yourself – you don’t get the search or filtering options usually available elsewhere.

Also bear in mind that PhotoRec doesn’t have many other features that you may take for granted in paid apps or more modern free software. It doesn’t have the high-end RAID or NAS abilities found elsewhere, for instance, and it won’t attempt repairs on pictures and videos. And, unlike many other software companies, PhotoRec isn’t available in bundles with loads of other PC utilities.

Indeed, the only other product made by CG Security is TestDisk. It comes bundled with PhotoRec, and it’s a utility for recovering and fixing hard disks and partitions. It’s certainly useful, although it only works using a command line interface and is therefore only suitable for people with plenty of tech experience – if that’s not you, it’s intimidating and incomprehensible.

  • Features: 2/5 

PhotoRec: Final verdict

There are plenty of positives to take from PhotoRec. It delivers fast and effective photo recovery in a straightforward interface for anyone with reasonable tech knowledge. Its open source nature means that it’s free – and a great option if you want to support that alternative method of software production and distribution. It works with loads of file types, devices and storage systems, so it’s extremely versatile.

The design ensures that PhotoRec is only suitable for people who consider themselves tech-savvy, though, and elsewhere this app doesn’t have the abilities you’ll find in other tools – or the ease of use.

PhotoRec is a good image restoration tool for tech-savvy people who want to support the open source movement or recover pictures from more obscure systems and devices, but beginners and people who need powerful extra features should look elsewhere.

PhotoRec: Scorecard

Plans & pricing Free and open-source, no cost 5
Features Basic tools on offer 2
Overall Fast, effective, and free - but limited features 3

Should I try?

Screenshot of photo recovery app PhotoRec

(Image credit: CG Security)

Try it if...

Don't try it if...

Dreo Pilot Max review

One minute review

The Dreo Pilot Max is a powerful oscillating tower fan that offers users a variety of speeds, modes and oscillation degrees to adapt to different preferences. This fan has been designed to offer extreme cooling as quietly as possible. Its minimal footprint is also a draw: it stands tall at 42 inches / 107 cm but takes up barely any floor space. 

Australian-based brand Dreo is best known for its tower fans. Released in 2022, the Dreo Pilot Max Tower Fan is the brand's latest model, improving upon its predecessor in a number of areas. It follows the Dreo Pilot Pro, which delivered nine speeds versus the Max’s 12 speeds, and 90-degree oscillation versus the Max’s 120 degrees.

The Dreo Pilot Max arrives with the brand’s all-new brushless DC motor, which can operate as quietly as 25db. The fan is also designed to adapt its fan speed to the ambient temperature through its Auto mode, but users can customize to their heart's content via Dreo’s user-friendly app, a remote control or via the controls on the fan itself. A stand-out feature of the Max is the fan’s ability to record the room’s current temperature and adapt its settings to achieve an ideal temperature.

The fan’s multiple speeds and degrees of oscillation will reach different areas of a large room and promise to cool you down, no matter where you’re sitting. When cooking in a kitchen, the fan successfully circulated the air to prevent that space from overheating. 

The Dreo Pilot Max is best suited for individuals and families looking for a powerful fan that will suit a variety of cooling preferences, with its adaptability and remote/app control options making it simple to operate. As someone who grew up with basic table and pedestal fans, I appreciated not having to move the Dreo Pilot Max around the room to cool different areas based on the time of day and activity. 

Dreo Pilot Max Tower Fan price and availability

  • List price: $129.99 
  • Available in a variety of stores

The Dreo Pilot Max costs $129.99 and is widely available from various stores including Amazon, Walmart and the Dreo website in the US. It’s not currently available in the UK or Australia.

While this fan is expensive when compared to other tower fans on the market, the features make it worth the money. Offering 12 speeds, four modes, four oscillation degrees, a silent motor, ambient intelligence and app capabilities, it’s a step ahead of its competitors. 

Price and availability score: 5/5

Dreo Pilot Max Tower Fan design

  • Stands tall at 42 inches (107 centimeters)
  • Easy-to-use LED display, remote control and app
  • Elegant and sleek design 

The Dreo Pilot Max 120° Oscillating Tower Fan boasts a simple but elegant design and arrives in just one color: classic silver. The cylindrical-shaped unit stands tall at 42 inches, but takes up a minimal amount of floorspace in a room. The circular base has an area of 113 inches (287cm) and the fan's dimensions are 11.81 x 11.81 x 36.22 inches (30 x 30 x 92cm).

It’s super-easy to set up using the Quick Start Guide, but there is a more detailed user manual available in the box, if you need it. Also in the box you’ll find two base halves, the fan, the remote control and the power adapter. Tools won’t be necessary for setup: simply put together the two base halves using the insertable pegs and slots. Once you slot the fan onto the base, securely screw in place with a nut. 

The Dreo fan features 12-speed settings and four modes. The modes include Normal, Natural, Sleep and Auto. The oscillation angle can be set to 30/60/90/120 degrees, but it can be changed only through the app. Other settings include a timer from 1 to 12 hours that will turn off the fan automatically depending on the time set, and a mute button to turn on/off remote-control sounds. 

Tower fans in general are designed to be less noisy, using their taller composition to distribute the maximum amount of air. Comparatively, pedestal fans may be more powerful but tend to take up more floor space. 

Design score: 4.5/5

Image of Dreo fan during testing at home

(Image credit: Future/Alex Paimas )

Dreo Pilot Max Tower Fan performance

  • A variety of working modes for different preferences
  • Powerful but silent fan
  • Easy to move around if needed

The Dreo Pilot Max is extremely easy to use, and you won’t have to take advantage of all its features to notice a significant improvement in air circulation and temperature when it’s on. The Quick Start Guide is helpful for initial setup, but thereafter, the basic features are intuitive. The control panel at the top of the fan has six clearly labeled options with easy-to-understand symbols. As you choose your options, the LED panel lights up and displays the chosen mode and speed of the fan. It also shows if it's connected to the Wi-Fi and if the buttons are muted. At night, the LED display will go into Dark mode to not disturb your sleep. 

To fully take advantage of all the fan has to offer, I recommend reading the manual. The most hands-off mode is Auto, where the fan speed adapts to the ambient temperature. It’s a great option for those users who simply want to turn on the fan and be done with it. In Normal mode, the fan will run at a constant speed. Natural mode will see the Dreo fan run at alternating speeds, mimicking a natural breeze. Finally, Sleep mode is the most intricate, with the fan speed decreasing every 30 minutes until it reaches level three, two or one, where it will remain constant for the rest of the night. 

Image of Dreo fan during testing

(Image credit: Future/Alex Paimas )

To test the fan, I placed it in two different rooms with different uses. My studio apartment has one large single room that’s both a bedroom and living space. As such, having a fan that can reach every corner without having to be moved is key to my and my partner’s comfort. Depending on how far away I was from the fan, I’d adjust the speeds and modes to make it as efficient as possible. Since the fan can reach up to 120 degrees of oscillation, my partner and I could enjoy the cooling capabilities of the Dreo Pilot Max, even if we were on opposite sides of the room. For general living purposes, the Natural mode proved best, since the alternating speeds and low noise meant that you could forget that the fan was in the room. The cooling felt natural, as if a breeze was passing through an open window.

In my kitchen, space is limited, and the area tends to heat up significantly when the oven or the stovetop is in use. But the Dreo Pilot Max came to the rescue. As soon as I started cooking, I turned it on in Normal mode, for a steady speed. In terms of oscillation, I set the fan to 60 degrees, which was appropriate for the size of the kitchen. Cooking in these new conditions was infinitely more pleasant; plus, cooling also prevented the warm air in the kitchen from escaping into the main living area – a regular occurrence prior to using the Dreo Pilot Max. At the highest speed level, the fan still operated silently, with noise never topping more than 48dB.

The handle at the top of the Dreo Pilot Max is great for easily moving the fan from one location to another. In addition, its 9lbs (4kg) weight allows it to be moved with almost no effort.

Performance score: 5/5

Image of Dreo fan during testing

(Image credit: Future/Alex Paimas )

Dreo Pilot Max Tower Fan app

  • Easy download and set-up
  • Can connect to Alexa and Google Home
  • Extra features aren’t included on the physical fan

Image of Dreo fan

(Image credit: Dreo)

The Dreo app is easy to navigate, and users can connect to their Dreo Pilot Max as well as other Dreo app-supported appliances. Once downloaded, I simply had to sign up and press the oscillation button on the fan for five seconds to start the network setting and device pairing.

On opening the app, you’ll see an image of the Dreo Pilot Max; you simply swipe up to access the settings. Here, you’ll see the current room temperature, with an option to change the mode, change or stop oscillation, speed level, set a timer, and turn the fan on or off. The remote and control panel allow the same functionality, except the ability to view the current room temperature and change the degree of oscillation. 

App score: 5/5

Dreo Pilot Max Tower Fan score card

Attributes Notes Rating
Price & availability The Dreo Pilot Max offers a wide variety of features that puts it above other tower fans in the market, justifying its price of $129.99. 5/5
Design The fan is elegant and easy to set up, but only comes in one color, which may be limiting for users who are looking for a model in something other than classic silver. 4.5/5
Performance The Dreo Pilot Max performed exactly as expected, with each of its modes suited to different situations. 5/5
App The Dreo app can integrate the Dreo Pilot Max with Alexa and Google Assistant, allowing control via your voice. 5/5

Should I buy?

Buy it if...

Don't buy it if...

  • First reviewed: September 2022

Motorola Moto G82

Two-minute review

The Moto G82 is part of a venerable family. For years, the Moto G series made our job pretty easy. Looking for a budget Android? Then buy the latest Moto G – advice that has stood for years.

In 2022, though, there have been too many Motorola phones released for the average person to keep up, and there’s now much greater competition from brands such as Realme, Xiaomi and OnePlus. 

However, the essence of the old Moto G spirit lives on in the Moto G82. It’s a sensible, reliable and uncluttered phone that comes with a fairly large OLED screen, 5G mobile internet, a decent amount of storage and stereo speakers, all at an appealing price. 

This particular model is spiced up with OIS (optical image stabilization), but this doesn’t elevate the camera to anything like the level of the Pixel 6a. While OIS counters against taking blurry images indoors, the Moto G82 camera doesn’t perform brilliantly at night, plus has weaker hardware than some of its slightly pricier competitors. 

The phone’s Snapdragon 695 SoC is also soundly beaten by the Qualcomm and MediaTek chipsets seen in phones that cost just slightly more. 

If camera image quality in more challenging scenes is a priority, or performance in demanding games such as Fortnite, for that matter, you should check out alternatives such as the Google Pixel 6a, the OnePlus Nord 2T, Realme Neo 3T and Xiaomi Poco X4 GT before considering a Moto G82. 

However, we can’t ignore that all of those devices typically cost more than the Moto G82, which should help turn down the volume on the numerous slightly weaker points detailed in this review. 

Motorola Moto G82 price and availability

Motorola Moto G82 clock on green background

(Image credit: Future / Andrew Williams)

The Motorola Moto G82 5G was released in June 2022 alongside the Moto G62, a lower-end alternative housing a weaker processor, thicker body and an LCD screen in place of an OLED panel. 

The G82 costs £289.99/$499AU, and while not widely available in the US at the time of review, it’s expected to cost around $365.

  • Value score: 4/5

Motorola Moto G82 design

Motorola Moto G82

(Image credit: Future / Andrew Williams)
  • Plastic build
  • Headphone jack
  • IP52-certified water repellent

The Motorola Moto G82 5G isn’t an outright beautiful phone; but it doesn’t need to be. Its build is pragmatic and simple, with plastic panels all-round, barring the glass protection of the screen. 

Its finish, like several other recent Motorola devices, also appears to follow that thought process. A silicone case comes attached as standard. Take it off and the cold metallic finish looks a little too bold, the dotted pattern on the back as if it belongs further under the surface than it actually sits.

Putting the case back on disguises all this. A simple layer of silicone softens its appearance, and pushes the dotted pattern into the background where it belongs. Note that the Moto G82 doesn’t feel too thick with the case on either; at 8mm thick, it’s slimmer than some older phones in this series and the step-down Moto G62, which is 8.6mm thick.

Motorola Moto G82

(Image credit: Future / Andrew Williams)

Case attached, the camera housing becomes the Motorola Moto G82 5G’s defining stylistic feature. An ultra-softened, rounded rectangle, the camera doesn’t come across as desperate to appear techy and advanced as some. That said, its “50MP” and “OIS” credentials are pasted alongside the lenses.

Any more coverage than the above and we end up over-analysing what is a fairly unadventurous but pleasant enough phone. 

The Motorola Moto G82 5G has a side-mounted fingerprint sensor that’s just half a beat slower than the best. It has a headphone jack and stereo speakers – one above the screen; another in the standard spot along the phone’s bottom edge.

Their output lacks low-frequency clout, but they don’t sound thin. As a pair they’re loud enough to let you listen to a podcast while cooking or having a shower. A stereo-style dual speaker array is, of course, always a blessing for YouTube, other video streaming apps and landscape-orientation games. 

In a similar vein, the Moto G82’s side-mounted fingerprint scanner doesn’t seem quite as high-tech as the in-screen style seen on a few rivals around this price. It’s fractionally slower than the very best, too; but, ultimately, it works perfectly well and has never failed to register a touch.

Motorola Moto G82 ports

(Image credit: Future / Andrew Williams)

There’s some water-resistance, too. It’s described as “water repellent”, a term Motorola has used for years now, but this time there’s an IP52 rating attached. 

This is about as low as gadget water-resistance gets — the “2” figure tells us it can withstand water sprays up to 15 degrees from vertical. In the real world this equates to a bit of rain, so the device should really be treated as a non-water-resistant mobile. 

Finishing up the design traits, the Moto G82 has a 3.5mm headphone jack, and the SIM tray has space for either a microSD card or second SIM.

  • Design score: 3.5/5

Motorola Moto G82 display

Motorola Moto G82 on a brick wall screen straight

(Image credit: Future / Andrew Williams)
  • 6.6-inch 120Hz Full HD OLED panel
  • Customizable color profiles
  • Peak brightness could be better

The Motorola Moto G82 5G has a 6.6-inch 120Hz screen with an OLED panel. It’s the spec you ideally want to see at this price, for the best contrast and color available in an affordable phone. 

However, it isn’t the best display around. We found it reaches 650 nits in direct sunlight, which is noticeably lower than the 770 of the Realme GT Neo 3T. Did we find it outright dim outdoors? No – it’s largely fine, just not a category leader. 

We also found the color temperature a little cool at the default setting. This is common, since a cooler tone can make a screen seem brighter and punchier. However, the Moto G82 looks better once it’s been tweaked slightly.

You can switch the Moto G82’s color from “Saturated” to “Normal” in the Settings menu, and a temperature slider allows for a warmer or cooler appearance. 

Like some other OLED panels, the Motorola Moto G82 takes on a slightly blue-green tint at an angle. This lines up with reports we’ve seen that suggest the phone has an LG P-OLED panel rather than a Samsung one. The latest Samsung OLED panels tend to avoid this particular issue. 

This is a 1080p screen, and it looks sharp and clean. Even if you spend a lot more on a phone, the most obvious improvement you’re likely to see is higher peak brightness in direct sunlight — and even that isn’t a given.

  • Display score: 4/5

Motorola Moto G82 software and performance

Motorola Moto G82 front angled apps drawer on green background

(Image credit: Future / Andrew Williams)
  • Runs Android 12
  • Qualcomm Snapdragon 695 chipset
  • Motorola-specific shortcuts/gestures

The Motorola Moto G82 runs Android 12 and uses the classic Moto interface. This makes fairly light changes to the Google blueprint, meaning you get to see the changes made to Android’s Material Design style in version 12. 

Drop-down menu items are now housed in colorful bricks. You can change this color in the Moto app, to give Android a more distinct flavor. 

The Moto G82 also has Peek Display, an information screen that displays when the phone is, for example, picked up while “asleep”. It shows the time and battery life. 

Like other Motorola phones the G82 also supports gestures, such as jumping to the camera app with two quick twists of the handset. Or you can toggle the torch with a double karate chop-style movement. 

Android 12 feels largely slick and smooth in the Moto G82, although app loading and multi-tasking will seem marginally slower than a flagship Android. This phone uses the Qualcomm Snapdragon 695 CPU, a mid-range chipset also seen in phones such as the Sony Xperia 10 IV and Realme 9 Pro.

While its CPU performance is good, the GPU – the graphics side – isn’t nearly at the same level as the Snapdragon 870, for example. This means some graphics settings won’t be available in certain high-end games, and those without rock-solid performance optimisation may suffer from a patchy frame rate at times. 

In Fortnite, for example, the Moto G82 is limited to the Medium graphics preset, and the 60fps mode available to some phones simply isn’t present in the Settings menu. This is largely because it wouldn’t be able to reach anything like that frame rate anyway. After playing a couple of rounds with the allowed settings, the phone did handle the game OK; but there are obvious frame rate drops when you take to the skies in one of Fortnite’s aerial vehicles. 

This somewhat limited gaming performance isn’t going to matter to everyone. However, some phones around this price, such as the Realme GT Neo 3T and Poco X4 GT, perform better.

  • Software and performance score: 3.5/5

Motorola Moto G82 camera

Motorola Moto G82 camera closeup on white background

(Image credit: Future / Andrew Williams)
  • 50MP-led triple rear camera system
  • Boasts OIS (optical image stabilization)
  • Quality lags behind competitors

The Motorola Moto G82 has three rear cameras, a 50-megapixel primary, an 8-megapixel ultra-wide and a 2-megapixel macro. Like all 2-megapixel macros, the one here is very poor. 

Our primary uses the Samsung JN1, a budget sensor designed to capture 12.5-megapixel pictures. It’s a lot less technically impressive than the great Sony IMX766 sensor seen in the OnePlus Nord 2T, or the Samsung GW1 of the Poco X4 GT. 

However, the Motorola Moto G82 also has optical image stabilization. This moves the camera lens slightly to counteract motion of the photographer’s hands. A few years ago, OIS was the only way to capture half-decent night images from a phone. But times have changed and night images these days are compiled using a whole stack of different pictures — a form of what is known as computational photography.

The Moto G82 in hand outside looking at the camera's viewfinder

(Image credit: Future / Andrew Williams)

The Motorola Moto G82 doesn’t take particularly good night-time photos, which may make you question what the OIS is actually for. It isn’t required in good lighting, where the short exposure time makes handshake blur a non-issue. It does help you avoid blurry indoors images, though, when the exposure might extend to 1/20 of a second. But you can still get far better night-time results elsewhere. 

Night photos aren’t even close to those from the Google Pixel 6a, for example – or, closer in price, the OnePlus Nord 2T. Even when you use the Night Vision mode, made for low light, truly dark pictures remain pretty dark, detail is limited, and what detail is present tends to look fuzzy and vague. 

Don’t put too much stock in the Motorola Moto G82’s use of OIS. The budget would arguably have been better spent on a slightly better sensor. 

However, the Motorola Moto G82 can take reasonably good-looking pictures during the day. Colors are engaging but not overbaked, the Auto HDR does a solid job of lifting shadows out of the doldrums, and avoiding blown-out areas in objects such as bright clouds.

Detail is generally fair, and the processing avoids the painterly appearance of some affordable phones. However, if you were to compare the Motorola Moto G82’s pictures with those of one of the best budget phone cameras – the Pixel 6a, for example – then you’d notice better texture reproduction and more confident-looking detail down at pixel level in rivals. 

This is, in part, because the Moto G82 has a sensor with a small surface area compared to its resolution. The Samsung JN1 is a 1/2.76-inch sensor, a little smaller than the 1/2.55-inch Sony IMX363 of the Pixel 6a (which also benefits from native resolution shooting), and dramatically smaller than the 1/1.56-inch Sony IMX766 of the OnePlus Nord 2T.

Both are at least slightly more expensive, but are alternatives to consider if you’re keen on having a phone that can take good pictures at night. 

The Moto G82’s 8MP ultra-wide camera suffers from the usual issues of secondary cameras in affordable phones. There’s significant loss of sharpness at the corners of the frame, and the lower dynamic range of the sensor is more likely to reveal the limits of the dynamic range processing, resulting in some blown out clouds in our test images. 

However, the ultra-wide can still take perfectly shareable pictures with reasonably rich color and enough detail not to appear instantly compromised when thrown up on a laptop-size screen. 

The Moto G82’s video is a flat-out disappointment. Chief among the complaints? It can’t shoot video at 4K resolution at all; 1080p is the max. 

You’ll only see software stabilization when shooting at a 30fps frame rate. There’s a 60fps mode, but this appears to be completely unstabilized, which is doubly disappointing when the phone has OIS. It doesn’t appear to be used at all in photo capture. 

We highly recommend sticking to the default 1080p/30 mode, since 60fps footage will look juddery if you don’t use a tripod, and the character of the image is far worse at 60fps. The picture looks significantly less detailed, and more aliased. 

The Motorola Moto G82 5G’s 16-megapixel front camera shoots 4-megapixel pixel-binned images by default. You can capture 16-megapixel pics using the “high resolution” mode, but we don’t think this mode is worth using. 

Pictures don’t look anything like four times as detailed – even in perfect lighting – and both dynamic range and image consistency are better if you stick to the 4-megapixel default. This isn’t a stellar selfie camera, but it’s solid enough to compensate for strongly backlit scenes and does OK with dimmer indoors lighting. 

  • Camera score: 3/5

Camera samples

Image 1 of 7

Motorola Moto G82 camera sample: A nice, bright image. There’s a slightly odd texture to the flatter blue areas in the sky, but most wouldn’t notice.

A nice, bright image. There’s a slightly odd texture to the flatter blue areas in the sky, but most wouldn’t notice. (Image credit: Future / Andrew Williams)
Image 2 of 7

Motorola Moto G82 camera sample: At times the G82 verges on making its pictures a touch too bright, but it helps them pop off the screen.

At times the G82 verges on making its pictures a touch too bright, but it helps them pop off the screen. (Image credit: Future / Andrew Williams)
Image 3 of 7

Motorola Moto G82 camera sample: While it has OIS, the Moto G82 isn’t capable of taking good low-light photos.

While it has OIS, the Moto G82 isn’t capable of taking good low-light photos. (Image credit: Future / Andrew Williams)
Image 4 of 7

Motorola Moto G82 camera sample: In scenes such as this, you can see the strength of the Auto HDR software, which keeps the foreground bright without blowing out those lovely cloud textures.

In scenes such as this, you can see the strength of the Auto HDR software, which keeps the foreground bright without blowing out those lovely cloud textures. (Image credit: Future / Andrew Williams)
Image 5 of 7

Motorola Moto G82 camera sample: The Moto G82 takes more vibrant images than the step-down Moto G62, despite having very similar hardware.

The Moto G82 takes more vibrant images than the step-down Moto G62, despite having very similar hardware. (Image credit: Future / Andrew Williams)
Image 6 of 7

Motorola Moto G82 camera sample: A slightly warm color temperature pairs well with nature scenes.

A slightly warm color temperature pairs well with nature scenes. (Image credit: Future / Andrew Williams)
Image 7 of 7

Motorola Moto G82 camera sample: While the ultra-wide has fairly low-end hardware, the phone’s HDR optimization lets it create some charming images.

While the ultra-wide has fairly low-end hardware, the phone’s HDR optimization lets it create some charming images. (Image credit: Future / Andrew Williams)

Motorola Moto G82 battery life

Motorola Moto G82 in hand on green background

(Image credit: Future / Andrew Williams)
  • Large 5,000mAh battery
  • Supports 30W fast charging
  • 50% charge in under 30 minutes

The Motorola Moto G82 5G has a 5,000mAh battery, the same capacity seen in a large and ever-increasing number of Moto-series phones. However, it’s good to see this capacity retained when this is a slightly slimmer handset than plenty of others in the Moto G family. 

Real-world stamina is good, but predictably doesn’t quite reach that of some rivals, such as the 60Hz Sony Xperia 10 IV and the old 720p Moto G50 5G, which have slightly less demanding components. Such phones can last almost two days, even with more demanding usage patterns. 

The Motorola Moto G82 5G is more likely to leave you with a solid but not mind-blowing 20-30% charge by the end of the day. However, there are a few techniques to tweak its longevity without switching on Battery Saver, which alters how the phone behaves. 

An OLED panel means the “Dark” UI mode and a dark or black wallpaper should reduce display power use a tad. You can also switch the screen refresh rate down to 60Hz, which we did on a couple of occasions when we knew a longer day of use was ahead. 

The Moto G82 also has good, although not remotely class-leading, fast charging. It supports 30W fast charging, and a 30W charger is included in the box. 

This takes the phone from flat to 50% charge in 27-28 minutes, and it reaches 100% after 80 minutes. The Moto G82 continues to draw a charge at a measly 4W for a while after, but when you’re running low on juice, the 2%-a-minute charge rate means just 10 minutes plugged in can see you right for a long night. 

There is, as is the norm at this level, no support for wireless charging.

  • Battery score: 4/5

Motorola Moto G82 score card

Attributes Notes Rating
Design Thin design but plastic build, best keep the in-box case on. 3.5/5
Display Nice 120Hz OLED panel could be brighter. 4/5
Software & performance Clean UX but not the most powerful phone. 3.5/5
Cameras OIS is nice but pictures are just OK. 3/5
Battery Google longevity and decent fast charging speeds. 4/5
Value A nice, low price for some premium features. 4/5

Should I buy the Motorola Moto G82?

Motorola Moto G82 front display angled

(Image credit: Future / Andrew Williams)

Buy it if...

Don't buy it if...

Also consider

The Moto G82 brings together a mix of technologies you wouldn't usually expect to see at this price point but that doesn't mean it's ahead in its category. As such, here are a trio of alternatives that might suit you better if you've decided the Moto G82 isn't for you.

Poco X4 GT
This phone is much better for gaming thanks to its seriously powerful MediaTek 8100 SoC. Charging is faster, too, although it isn’t as readily available as the Moto G82 in some countries.  
Read our Xiaomi Poco X4 GT review for more

  • First reviewed September 2022

Philips L’OR Barista Sublime review

One-minute review

Made in partnership with single-serve coffee machine pioneer Philips, the new L’OR Barista Sublime boasts some useful features not commonly associated with pod coffee machines. This type of machine is a popular choice, and is often found on any number of the best coffee machine roundups, since it’s highly rated for ease of use and delicious results.

Launched in August 2022, the L’OR Barista Sublime has been created in collaboration with designer Khodi Feiz. It has a unique double-spouted design, which allows you to make two drinks at the same time, and it accepts the new and exclusive L’OR Barista XXL capsules, which contain twice the amount of the smaller capsules. The new coffee machine is also compatible with L’OR espresso single-shot capsules and most Nespresso Original pods, so it could now be up there with some of the best Nespresso machines, too.

Helpfully, L’OR capsules are readily available in the majority of supermarkets. A team of coffee artists create each L'OR blend, ensuring that only the best beans are harvested for a quality cup of coffee. L'OR has also partnered with a pod-recycling service, in order to help make it easier to recycle its pods. We didn’t receive Podback bags with our review unit, but the L'OR website claims that you will.

The coffee machine arrives with nine capsule samples, which is plenty to get going; we would have welcomed a few more decaf options, though. For around £100 for the package, the L'OR Barista Sublime doesn’t come in at too eye-watering a price for those who want to start making coffee-shop style coffee at home. With fewer trips, if any, to the coffee shop, you'll very quickly make back the money spent, plus it was far less effort than we thought to make our perfect cup of coffee with this machine.

L'OR Barista Sublime coffee machine with sample capsules

(Image credit: Future / Jennifer Oksien)

Philips L’OR Barista Sublime price and availability

  • List price £104 / $AU 159

The Philips L'OR Barista Sublime is an affordable pod coffee machine, compatible with the new L’OR Barista XXL capsules, L’OR espresso single-shot capsules, and a range of alternative branded coffee capsules including Nespresso.

In the UK we've found it available to buy from lorespresso.com, Amazon, AO.com, and Argos . And in Australia we've found it available to buy on Appliances Online, although it is currently out of stock. It's not currently available in the US.

Philips L’OR Barista Sublime design

  • Compact
  • Removable drip tray and water tank for easy cleaning
  • Double spouted, so that two drinks can be made at the same time

Unpacking the Philips L'OR Barista Sublime from its box, we were surprised at just how light and compact it was. Measuring 4.3 x 5.11 x 15.7 inches / 11 x 13 x 40cm (h x w x d), and weighing 7.38lbs / 3.35kg, it comes fully assembled – even the removable drip tray was in situ – so it’s pretty much ready to use straight out of the box.

Both the removable drip tray and 27.05 fl.oz/  0.8-litre water tank are dishwasher-safe; however, they’re just as easily cleaned under running water.

Removing the drip tray provides access to the bin in which used capsules drop. We found this bin could comfortably hold around a dozen capsules, so depending on how many cups of coffee you drink, it will need emptying every, or every other, day.

One of the standout features of the L’OR Barista Sublime is the double spout. It means that we were able to make two drinks at the same time with the XXL double capsules. We haven't come across many, if any, pod coffee machines that come with such a design feature.

L'OR Barista Sublime side view on kitchen work top

(Image credit: Future)

Philips L’OR Barista Sublime performance

  • Three settings to choose from
  • Creates a nice crema
  •  Compatible with a selection of capsules 

We were pleasantly surprised to see that the L'OR Barista Sublime arrives with a taster box of nine different capsules. In our household, we have a preference for drinking caffeine-free coffee, so we were slightly disappointed that the selection included only one such pod. Nevertheless, upon tasting the different coffees over the course of testing, there wasn’t one that we disliked.

The XXL double capsules proved most helpful, since we could use them to make two cups of coffee at the same time. Granted, you’ll get more coffee in your mug if you use the contents of the larger capsule for just one mug, but we usually had a recently boiled kettle on standby to top up our drinks with boiling water.

The double spout on the Philips L'OR Barista makes two drinks

(Image credit: Future / Jennifer Oksien)

The Barista Sublime presents three settings – Ristretto, Espresso and Lungo – and the setting for each of the capsules in the tasting box was clearly marked. This is one of the many reasons that this coffee machine is so great for beginners. The lack of setup and the ease of the process means that you’ll get your cup of coffee in no time at all.

Through testing, the machine consistently produced coffee with a rich aroma and thick crema, with no hint of the coffee tasting burnt or overly bitter. The tasting box was great for figuring out which flavors tickled our taste buds, before stocking up on our favourites. As mentioned, a few more decaf options would have been welcome.

The L'OR Barista makes a coffee with a thick crema

(Image credit: Future / Jennifer Oksien)

On each setting the coffee was dispensed at 170.6-176ºF/ 77-81ºC, which is a good temperature and around what we’d expect. It took just a few seconds for the water to heat up – it was slightly quicker on the Ristretto setting – but there’s no option to adjust the temperature, if you like your coffee piping hot, for example. Similarly, neither can you control the amount of water dispensed – although the dual capsule recognition technology automatically detects the capsule inserted, pouring the correct amount of water for that size.

For noise, we measured the L’OR Barista Sublime at 52dB on our noise meter, which is somewhere between moderate rainfall and normal conversation. It wasn't loud, but you will hear it in operation, especially if there aren’t any other appliances running.

In terms of maintenance, the only regular task will be to empty the used capsule bin – although this will very much depend on how much coffee you get through in a day; it holds 12, remember. Both the bin and drip tray will benefit from the occasional rinse, as will the water tank. And if you’re someone who likes to have their coffee machine on display on the counter top, a gentle wipe with a cloth will keep it looking nice.

Used coffee capsules are stored in the L'OR Barista

(Image credit: Future / Jennifer Oksien)

Like all coffee machines, descaling is advisable, too. How often is unclear from the instruction booklet, but you'll know when the coffee machine is ready for it because the Ristretto and Lungo buttons will start blinking after brewing a coffee. L’OR recommends using the L'OR Barista CA6530/00 Coffee Machine Descaler for the job, with full descaling taking around 40 minutes.

Score card: L'OR Barista Sublime

Attributes Notes Score
Value Widely available in the UK at an affordable price; not available to buy in the US. 4.5 / 5
Design Super-easy to use and the double spout is great for making more than one cup of coffee at a time. A milk frother would always be good to have, though. 4.5 / 5
Performance Produces coffee with a lovely, thick crema and at a consistent temperature, although more temperature control would be handy. 4.5 / 5

Philip's L'OR Sublime on Lungo setting

(Image credit: Future / Jennifer Oksien)

Should I buy the Philips L’OR Barista Sublime?

Buy it if...

Don't buy it if...

  • First reviewed: September 2022

Kodak Step

Two-minute review

Kodak Step Specs

Film format: 2x3in Zink zero ink
Sensor: 10MP
Lens: Fixed-focus, f/2.8
Shooting modes: Colour, sepia, monochrome, self-timer
Viewfinder: optical, fixed
Battery: li-on rechargeable

It was once one of the camera world's biggest brands, but Kodak is a relative unknown when it comes to present-day instant photography. The hybrid Kodak Step is hoping to change that and force its way into our guide to the best instant cameras.

Unlike rivals Fuji Instax and Polaroid, the Step eschews analogue film for Zink, or 'Zero Ink', prints. Each one has layers of cyan, magenta and yellow ink embedded in the paper, and reacts to heat to produce images. 

It relies on a digital sensor, so isn't as authentic as true instant film, but is significantly cheaper, and the cameras that use it are physically smaller. Essentially, you're getting most of the fun of instant at a much lower price.

Image 1 of 3

Kodak Step Instant Camera

(Image credit: Future / Tom Morgan)
Image 2 of 3

Kodak Step Instant Camera

(Image credit: Future / Tom Morgan)
Image 3 of 3

Kodak Step Instant Camera

(Image credit: Future / Tom Morgan)

The Step might remind you of the Polaroid Snap, a similar hybrid camera launched back in 2016. Without getting too bogged down over naming rights, it's essentially built by the same parent company but now sporting a Kodak logo.

With few buttons, no touchscreen and a delightfully simple operation, the Step is a proper point-and-shoot instant camera. Its 10-megapixel sensor is largely on par with a basic modern smartphone, so the digital backups it makes of each photo are more a bonus than a must-have feature, but this doesn't detract from the charm of its instant prints. 

They are nowhere near as detailed or vibrant as Instax film, with noticeable print lines and a real lack of contrast, but the peel-and-stick adhesive back makes them perfect for scrapbookers.

This back-to-basics approach won't appeal to photographers already familiar with instant film, but the affordable film packs make it a fun way to introduce instant to the younger generation.

Kodak Step Instant Camera

(Image credit: Future / Tom Morgan)

Kodak Step: Design and Features

  • Shoots 2x3in ZINK photos
  • Lightweight, pocket-friendly plastic build
  • Simple, intuitive button layout

With no need to expose its film to the light like a traditional instant camera, the Step is significantly smaller than rivals from Fujifilm. The rectangular body is compact enough to fit in a pocket, and the rounded corners make it comfortable enough to grip securely.

All the buttons line the top edge, with the big red shutter button being impossible to miss. The self-timer button next to it doubles as a power button, which flips open the viewfinder as the camera turns on. To turn it off again, you manually flip the viewfinder closed. 

The Color mode button toggles between color, sepia and monochrome shooting, which applies to both the digital and physical version of each image. Finally, a frame button adds an Instax-aping white border around your photos.

You load film at the back, sliding down a catch to open the spring-loaded door. Paper sits rather loosely inside the tray, which can lead to some photos not printing perfectly straight (something more noticeable when using the frame mode). On the plus side, the paper doesn't react to light like Instax film, so you won't ruin your remaining shots by accidentally opening the door when there's still paper inside.

Image 1 of 4

Kodak Step Instant Camera

(Image credit: Future / Tom Morgan)
Image 2 of 4

Kodak Step Instant Camera

(Image credit: Future / Tom Morgan)
Image 3 of 4

Kodak Step Instant Camera

(Image credit: Future / Tom Morgan)
Image 4 of 4

Kodak Step Instant Camera

(Image credit: Future / Tom Morgan)

Kodak Step: Performance

  • Each photo takes around 30 seconds to print
  • Offset viewfinder makes composition tricky
  • MicroUSB charging

Take a snap and the Kodak Step will print it automatically, taking roughly 30 seconds to spit out the photo. Each image is about the size of a credit card, and you can peel the back off and use them as stickers. Packs of paper are cheaper than Fuji's Instax Mini, at around 50p per print.

If you've fitted a microSD card, a 10-megapixel digital photo gets saved simultaneously. You don't need one to be able to take instant photos, but annoyingly once you run out of Zink paper you can't take digital snaps at all until you load a new pack. With no built-in screen you'll need a computer to review your digital pics, but that's hardly a shock given the double-digit price.

Image 1 of 3

Kodak Step Instant Camera

(Image credit: Future / Tom Morgan)
Image 2 of 3

Kodak Step Instant Camera

(Image credit: Future / Tom Morgan)
Image 3 of 3

Kodak Step Instant Camera

(Image credit: Future / Tom Morgan)

Framing your subjects is made trickier by the offset viewfinder, which gives no indication as to where the borders of the image will be. It's particularly troublesome for close-ups, where it's all too easy to lose limbs or the tops of heads, and there's no front-facing mirror for lining up selfies. With no digital reminder to remove the lens cap, which is held magnetically to the front of the camera, it's also quite easy to end up with completely black prints.

The built-in battery is good for around 20 photo prints, or two full packs of ZINK paper. A full charge takes around two hours over microUSB, with the port located at the side of the camera. 

Kodak Step

(Image credit: Tom Morgan)

Kodak Step: Image Quality

  • Prints are colorful but show visible printing lines
  • Limited dynamic range, struggles with far-off detail
  • Digital images worse than most modern smartphones

Each Zink print looks presentable from arm's length, but look closer and it's all too easy to spot the printing lines. It's most prominent on darker landscape snaps with blue skies that fill the entire frame, and less noticeable on more brightly-exposed photos. Unfortunately, the camera somehow manages to make even well-lit scenes look drab and dimly lit at times.

Colors are closer to traditional 35mm film than the lighter, almost pastel-like hues of some instant film. It only takes a little extra light to blow out a scene, but prints of well-balanced daylight landscapes usually have a good amount of pop. The small digital sensor can quickly begin to struggle as the light goes down, though, with noise ramping up and details quickly lost.

Digital images show a general lack of sharpness, and detail is merely OK. Exposures look more true-to-life here than they do after printing, but highlights are regularly overblown. Any current-generation smartphone can likely do a better job, regardless of light levels.

Image 1 of 16

Kodak Step

(Image credit: Tom Morgan)
Image 2 of 16

Kodak Step

(Image credit: Tom Morgan)
Image 3 of 16

Kodak Step

(Image credit: Tom Morgan)
Image 4 of 16

Kodak Step

(Image credit: Tom Morgan)
Image 5 of 16

Kodak Step

(Image credit: Tom Morgan)
Image 6 of 16

Kodak Step

(Image credit: Tom Morgan)
Image 7 of 16

Kodak Step

(Image credit: Tom Morgan)
Image 8 of 16

Kodak Step

(Image credit: Tom Morgan)
Image 9 of 16

Kodak Step

(Image credit: Tom Morgan)
Image 10 of 16

Kodak Step

(Image credit: Tom Morgan)
Image 11 of 16

Kodak Step

(Image credit: Tom Morgan)
Image 12 of 16

Kodak Step

(Image credit: Tom Morgan)
Image 13 of 16

Kodak Step

(Image credit: Tom Morgan)
Image 14 of 16

Kodak Step

(Image credit: Tom Morgan)
Image 15 of 16

Kodak Step

(Image credit: Tom Morgan)
Image 16 of 16

Kodak Step

(Image credit: Tom Morgan)

Kodak Step verdict

There's a certain charm to the Kodak Step's simplistic yet modern approach to instant photography. Though its digital images are beaten by any half-decent smartphone, and the prints it produces vary drastically in quality, its affordable nature means anyone looking for an introduction to instant film shouldn't write it off.

It's cheaper to run than the Fuji Instax Mini 11, small enough to slide in a pocket, and basic enough that children won't struggle to use it. It could easily find a place as a family scrapbook companion or a fun addition to parties.

However, Zink paper isn't as authentic as Instax or Polaroid film, and the digital-first nature won't appeal to instant purists, who would be better served by the more feature-packed Fujifilm Instax mini 90.

Should I buy the Kodak Step?

Kodak Step Instant Camera

(Image credit: Future / Tom Morgan)

Buy it if...

Don't buy it if...

!!!!!!!!!!

Popular Posts

Categories

Blog Archive